 GUNPLA
GUNPLABuilding little plastic model kits based on imaginary giant robots is a lot of fun, and can be quite theraputic. Here I'll be sharing photos of kits I am working on in various stages of completion.
HG OZ-06MS-SS1 Leo-S
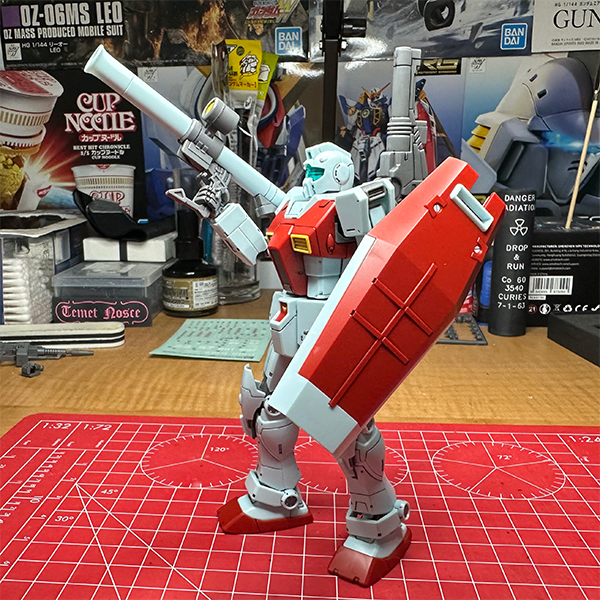
This kit is a P-Bandai refit of the standard High Grade Leo, but shares surprisingly few parts with the kit on which it is based. However... rather than making all new runners for it Bandai has instead decided to include an entire red variant of the standard Leo runner... We'll get more into that later. The kit is predominantly red with a smattering of gold details. It should be noted that the gold is not the chromed gold which is commonly seen these days and for that I am thankful. While the non-chromed gold isn't particularly brilliant in that the metallic-flake inclusions tend to highlight where the gates were regardless of one's efforts in gate removal it is at least easier to surface prep for paint. The countless spare red parts and duplicate runners included in this kit also provide plenty of plastic for creating lots of sprue goo to fill the many seam lines present on the model. The Leo-S shares quite a bit in common with the Tallgeese thanks to its slightly longer lower legs, the thruster assembly on the rear of its skirt and of course its knight-like appearance. The beam-diffusor cloak looks great despite it being a very solid plastic, though should you want to give it a more dynamic pose you could hit it with a heat gun or hair dryer to soften it up a bit and gently reshape it. Once the temperatures warm up I will most definitely be taking this kit outside and give it a nice candy apple red paintjob and some more gold-like detailing.
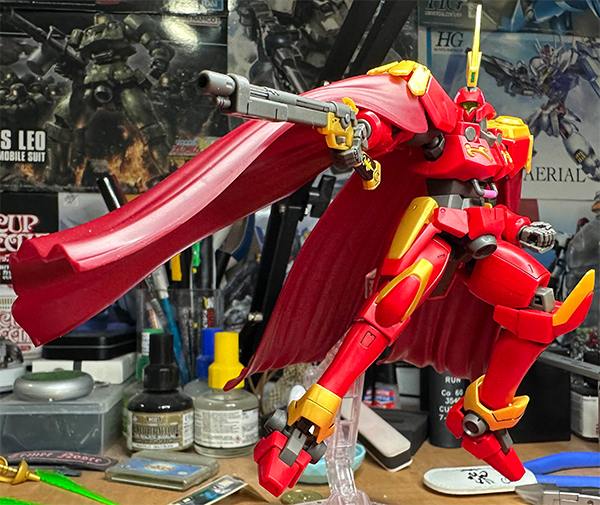
The kit poses quite well despite being heavily based on the original High Grade Leo. This certainly gives me hope that one day we'll see a new High Grade Tallgeese! There are very few color-correcting stickers in this kit, though those that are present are very easy to apply and look pretty good. I decided against adding the reflective sticker to the suit's visor so that the classic Leo square camera inside its head can be seen up close.
Accessory wise there isn't much to write home about. There are two saber hilts which can be attached to the kit's waist, and two hilts and beams which can be held. Seen here is the standard holding-hand which is equipped when the Leo-S isn't holding its beam musket. The hand for the beam musket has a slanted wrist in order to accomodate the awkward shape of the gun and works quite nicely. What this kit lacks in gimmicks and accessories it makes up for in style. It really is amazing what some slight changes to a grunt suit make!
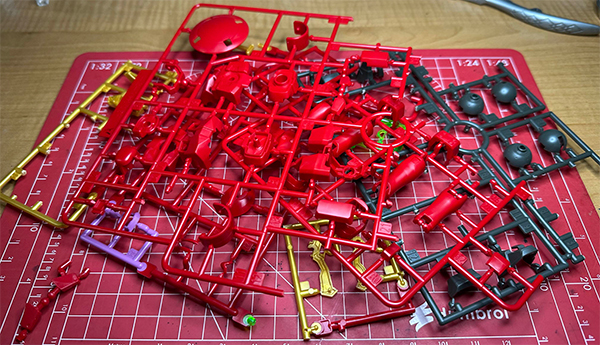
Now we come to the elephant in the room... The waste. No, this isn't an unbuilt kit. This is the left over runners once the Leo-S is complete. There is almost an entire Leo's worth of armor components, as well as some duplicates of the Leo-S specific parts. This does afford one the option of customizing a standard Leo, should one wish to but the simple fact of the matter is that each additional runner drives up the cost of a kit and were Bandai to put in the effort to reduce the runner count this just might've been a standard release rather than P-Bandai. That said, I've very few complaints about this kit as a whole and I can never argue with a Tallgeese-like design. All in all this is an excellent kit and even though it is P-Bandai I must highly recommend it!
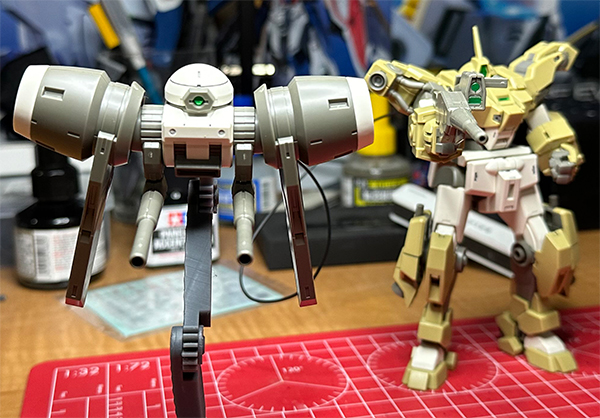
Master Grade Mobile Pod Ball Ver. Ka
This kit was a quick, simple, but very much enjoyable build. Released in December of 2004, the RB-79 Middle-Range Support Type Mobile Pod Ball Ver. Ka remains surprisingly satisfying to this day despite its apparent lack of gimmicks or accessories. The particular one I built is from the original release, and seems to have both been shipped around a lot, given the condition of the box and has at some point been stored in a very hot environment as there was a fair bit of warping to some of the parts, with one of the included maintenance crew figures suffering a crack in his leg. Even still this build was a lot of fun and a rather interesting look at older Master Grade kits. While I wouldn't call them gimmicks, there are a few pleasant oddities in the construction of this kit. Chief among these is use of numerous TPE rubber parts. The rubber parts are primarily used as sockets for moving peg-and-hole joints and also serve as the dark grey sleeves into which the arms fit. One might expect that after twenty years in storage the TPE rubber would have either dry-rotted or returned to the oil from whence it came, but no! There is also a length of wire, which is then cut into two then woven through some components on the graspers to make what appears to be some hydraulic or pneumatic line! Lastly, there is a pair of metal rods which sit beneath the arms and add to the appearance of a hydraulic assembly. I'm not entirely sure why they chose to include some steel rods rather than go with the usual chromed plastic but it is a welcome surprise indeed. Another unusual inclusion in this kit is the stand, without which it would be rather difficult to display as it has no flat surface on the bottom on which to sit.
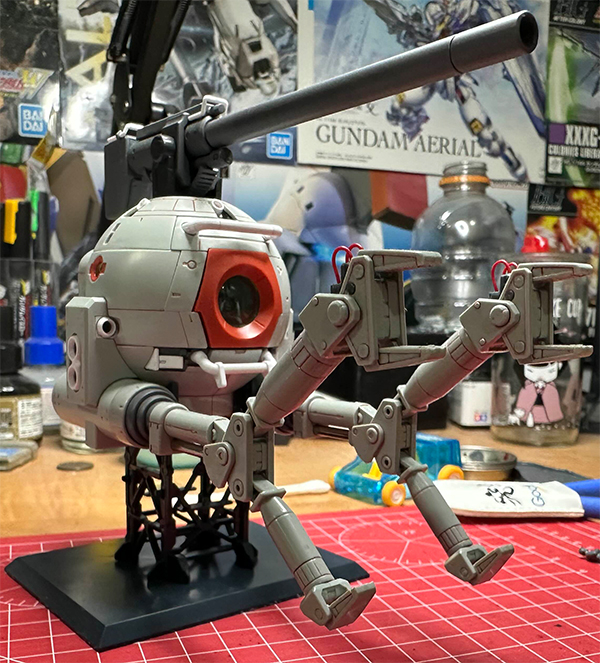
Also included, and not pictured was a very nice sheet of sticker decals, and a sheet of dry-transfer decals. One of the dry-transfer decals didn't take to its 20 years in storage very well and had begun to peel away from the sheet but otherwise they all seemed to survive just fine, and I will be sure to report back when I revisit this kit and decal it up after giving it a nice layer of paint. On the matter of paint, I did give the cannon a quick spray because it had the only egregious gates on the whole of the kit and no amount of filing or buffing was suffecient to remove their discoloration.
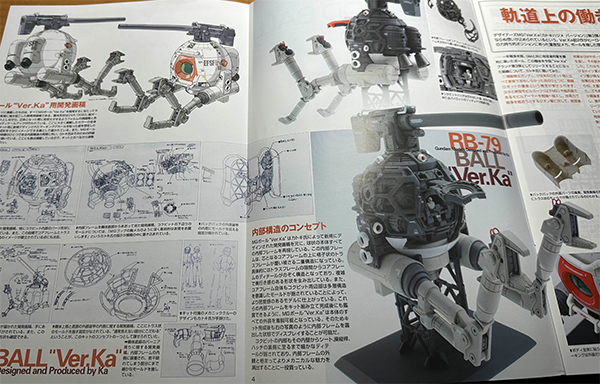
This kit's real party piece is one which is completely hidden upon completion, its impressive level of internal detail. All manner of struts and mechanical systems are hidden beneath the surface of this deceptively simple sphere, and the manual makes sure to highlight this in its many pages and fold-outs of artwork, schematics, blueprints and photographs of the kit at various stages of completion. These older Master Grade manuals really are themselves works of art. It's things like this that make obvious the care and attention that went into design of these kits.
Kotobukiya 1/35 scale Tachikoma
I had actually finished this not long after posting the MGSD Wing Zero EW, but I've not gotten around to posting it for a few reasons. Not least of which is that I haven't much nice to say about it. I love Ghost in the Shell, it is one of my favorite series. It holds a special place in my heart for a multitude of reasons. This kit on the other hand can fuck right off. I know in my latest posts I have spoken poorly of Bandai and the seeming decline of their model kit mastery... but building this kit from Kotobukiya has reminded me just how good Bandai is at what they do. When talking about the MGSD Wing Zero EW I complained about poor gate placement, and in retrospect that kit's gate placement is fantastic compared to this monstrosity. Every single gate was in the worst possible place. They even managed to put the undergates in inconvenient places. Many gates were on the tiniest and most delicate areas of the smallest pieces which made filing and buffing quite a challenge. To say the part fitment is not brilliant would be an understatement. Some parts fit so loosely they want to fall out if you look at the too hard while others have seemingly adhered together at the molecular level and become entirely inseparable. On the upside though, this kit has good articulation and a plethora of screen-accurate gimmicks and even character figurines.
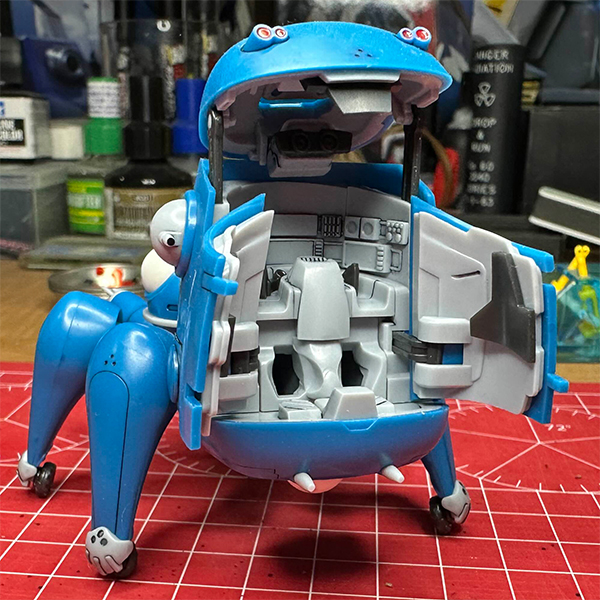
The entire cockpit opens up to reveal seating for the included Motoko Kusanagi figurine (not pictured as I do not have the necessary paints for flesh tones. Maybe some day) as well as all of the gadgetry one would expect. It's even got the little viewfinder mounted to the canopy! Like everything in this kit, these details will need painted.
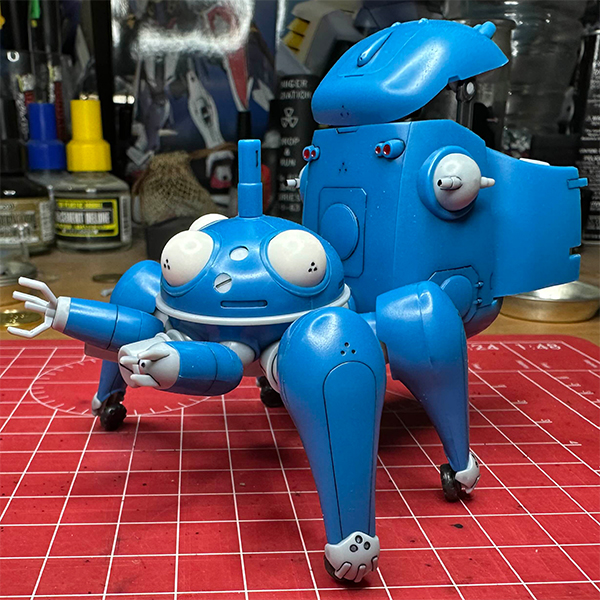
Each eye can swivel about independently, though they've each got some nasty flashing left over from the moulding process which will need very carefully filed off otherwise it is clearly visible when the eyes are pointed at extreme angles. Not pictured is an included stand for jumping/aerial poses, which attaches rather cleverly by replacing the eye on the bottom of the cockpit.
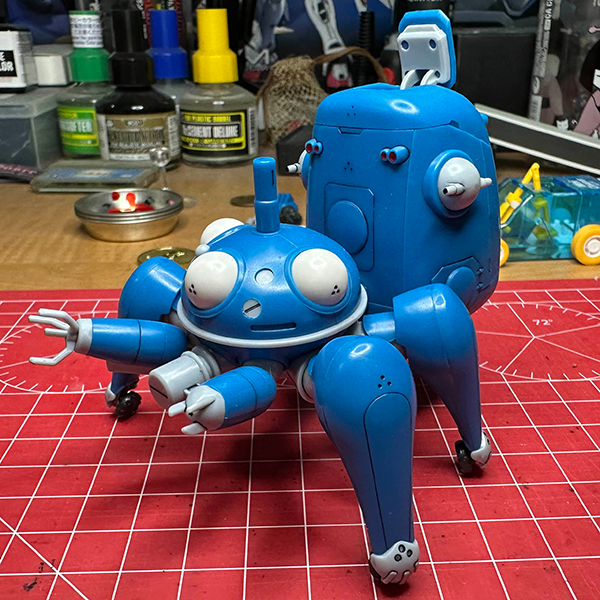
The tank-style hatch atop the cockpit opens so the Major can stick her head out and talk to folk, or look around.
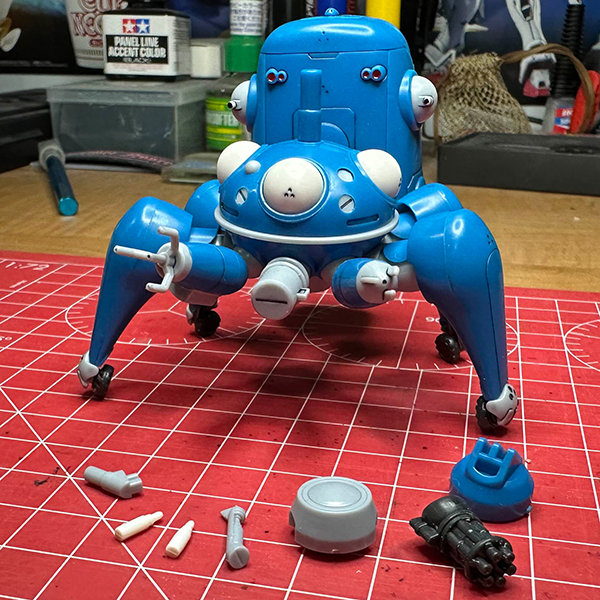
When it comes to gimmicks the kit includes two bottles of oil, a port with an oil bottle in it which can replace one of the grey circular pieces next to the central eye... though you'll want to choose whether you want oil port open or closed during assembly as swapping them once built may be a challenge due to the tight fightment of the domed head pieces. There's a replacement central bottom piece with a hole in the center for attaching to a standard 3mm peg stand (which is the one I have installed, pictured is the one without the adapter). There is a spare leg joint, and a minigun to swap out with the grenade launcher. Oh! And the grenade launcher's pin and cover can be removed and a grenade is included as well! As far as figures go there are three. A standing Batou, a riding Motoko, and the little girl whose name has escaped me that one of the Tachikomas effectively kidnapped under the guise of helping find her dog.
Master Grade Superdeformed Wing Zero EW
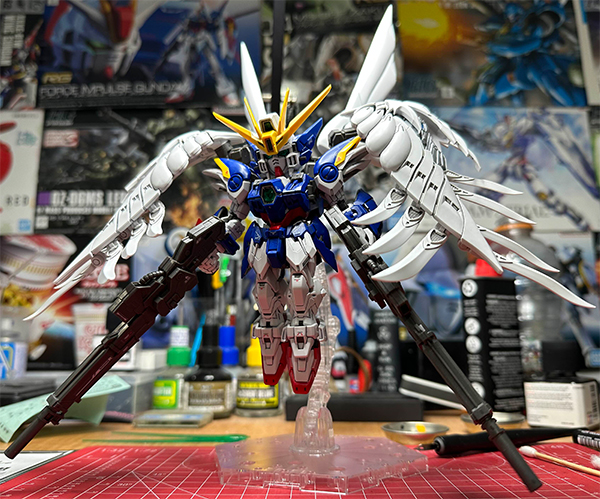
Somehow I've survived the past few months, and I finally have another kit to share with you today! This one is my first MGSD kit, which is the third entry in the line. When I began building some months ago it was the latest entry, but now Gundam Ariel has entered the lineup. I've got a lot of thoughts on this kit but I'll try and keep the wall of text to a minimum. We'll start with what I love about this kit, first and foremost of which is its insane level of detail! From the eyes and head cameras to the tiny half-sphere screen in the opening cockpit being a different color to the rest of the control panel this kit is jam-packed with intricate little details. Every clear piece on this kit is either textured as seen on the wings or has benind it a plethora of details that bring life to superdeformed kit. Then we come to the articulation and the masterful engineering doesn't stop there! The two central wings have a folding mechanism which reveals a series of feathers as they open up, and the two outer wings have layers of swiveling, shifting and sliding components each revealing yet more elaborate minutae. Despite the inherent chunkiness of SD designs, the rest of the body is brilliantly articulated as well and lends itself nicely to all manner of standing poses... though Wing Zero is always best displayed in flight. On the matter of flight, they've even managed to pack an excellent Neo-Birdmode transformation into this thing! What's more, the build process was overall very enjoyable with the exception of a few small issues which I'll cover after these images.
I am once again considering making it so that the images on this page can be clicked to expand them out to a higher resolution version as the 600 pixel width restriction I have imposed on myself simply does not do kits like Wing Zero justice.
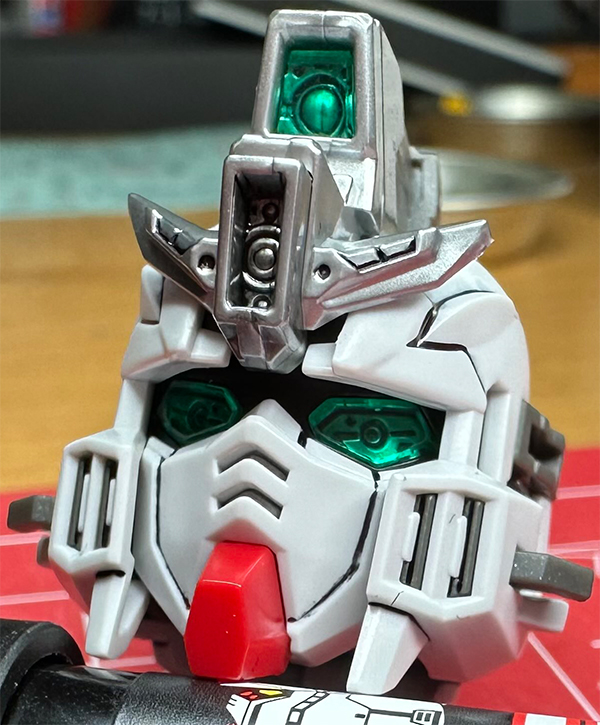
The head was the first section I had built, and it became immediately apparent that with the MGSD line Bandai is showing off just how good their injection moulding systems are. The silver sections behind the eyes and head cameras have deep panel lines which take very well to either a pour-type pen or a pot of Tamiya panel line accent color.
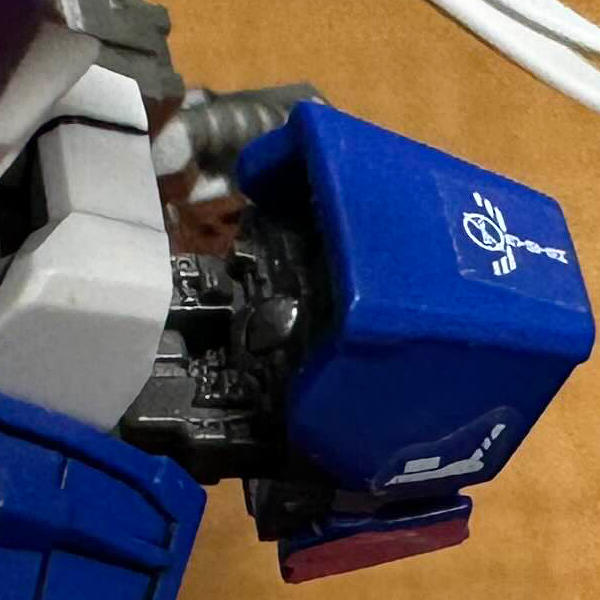
When moving onto the torso I was slightly confused as to how the cockpit section would come together... until I realized that the tiny circular cutout in the instrument cluster was there to allow a small protrusion on the back of the chest camera housing to stick into the cockpit and become the domed screen seen at various points in the Endless Waltz film.
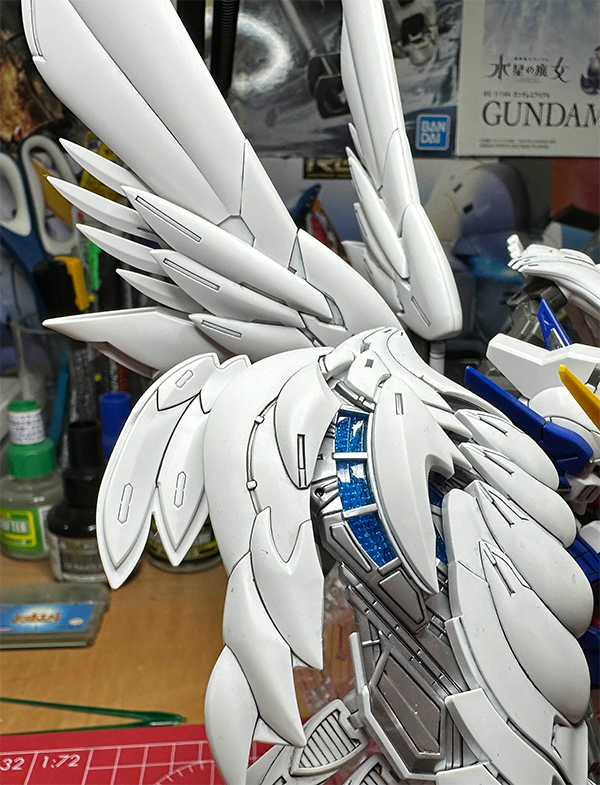
The wings were admittedly a bit of a pain to build, as is often the case with the various versions of Wing Zero EW Bandai has released over the years. In one part due to the repetitive nature of building all the feather pieces, another part due to a minor error in the instructions regarding the order of assembly on one section and... something else we'll touch on later.
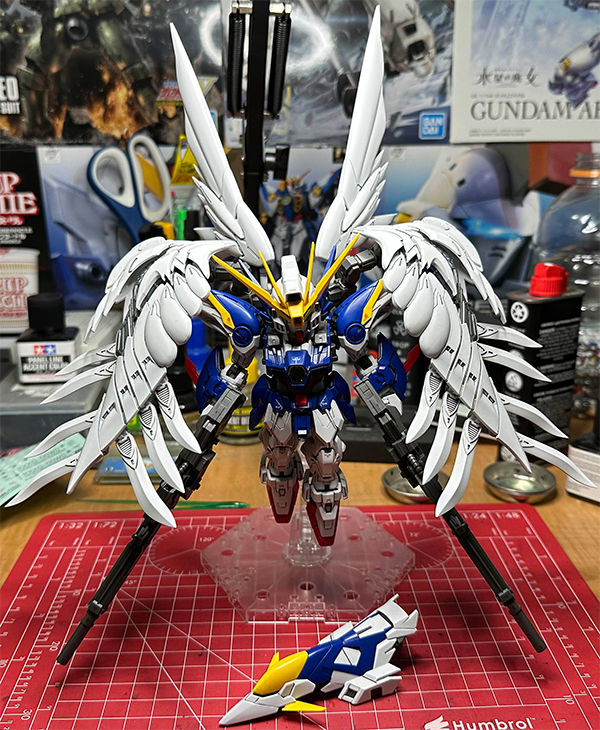
This kit really is gorgeous, and definitely needs a taller display stand than I have... I can't even fully extend the buster rifles withut them hitting the table! ...But this kit hides a dark and terrible secret. Bandai has completely forgotten how to lay out runners and gates. There was a great time, not long ago. A golden age of Bandai model kits when their runners were laid out beautifully, a time when they knew how to place gates such that they were well hidden. Never would they have placed a gate on a prominently visible section and certainly never on a front-facing curved or otherwise complex part provided there was somewhere else they could put it. But this kit... marks the end of that age. Every single gate was in just about the worst place it could have been. They wouldn't have even needed any under-gates to sort this, no. All they'd have needed to do was put the gates on or near edges rather than smack-dab in the middle of curved surfaces like the front of the shoulders, or in difficult to file places on the wing feathers, but no. It was as if they determined gate placement by throwing darts at a bulletin board with pictures of each part. What could have been the pinnacle of zen gunpla building was instead an exercise in endlessly staring through a magnifier while ever so carefully filing each and every one of the numerous gates. Future archeologists will wonder why there is a fine layer of multicolored plastic powder stretching for miles around this residence. My lungs contain more dust than that of a Victorian child after a full fourteen hour shift constructing one of Sir Henry Bessemer's ships.
30 Minute Fantasy Liber Holy Knight
Today we have another entry in Bandai's '30 Minute' line of kits! I will start by saying that you absolutely can build this kit in thirty minutes as the product line suggests, however... you'll probably want to spend at least a little bit more time on it than that, as I certainly have. The 30 Minute Fantasy series is a new and very much welcome addition to the 30 Minute line, it consists of a number of knights which appear to be a re-imagining of Dark Souls in a cybernetics-dominated world. This line shows a marked improvement over previous installments in the 30 Minute series and brings with it more detailed panel lines and a bit more color separation. Unlike a particular 30 Minute Missions tiltrotor kit, this one has a few slightly different shades of white and gray throughout which livens things up a bit for sure. Unfortunately the difference in shades is so slight that it does not come across well in the photos you'll see below, but trust me it's there and is more apparent in person. While this is most definitely a big step forward for the 30 Minute line it is not without its own issues. As seems to be consistent throughout the 30 Minute line this kit suffers from terribly placed gates which result in awful nub-marks if you are only doing a single cut from the runner. I had originally intended on building this kit as quickly as possible and with no filing, sanding, and buffing but many of the gates were so poorly placed and so very egregious that I could not resist the urge to painstakingly do my best to erase them. What's most perplexing about this is that Bandai has the technology to make such awful gate placement a thing of the past. They demonstrate this on a regular basis with under-gates and the like on Real Grade kits, Perfect Grades, and Master Grades but for some reason this simple trick never makes its way into other grades or lines. A few simple undergates here and there could have made this kit near perfect and yet they insist on putting gates on prominent geometrically complex surfaces rather than hiding them as we all know they can. That aside, this kit is brilliant. It's separated into a few different stages, each of which can readily be displayed in one's collection. The first stage is known as the silhouette, which is a basic humanoid android or cyborg looking figure with excellent posability. The articulation is similar to that of the 30 Minute Sisters line but with a few more degrees of freedom. If you're an artist and need a physical posing reference model the silhouette stage of these 30 Minute Fantasy kits isn't a bad choice!
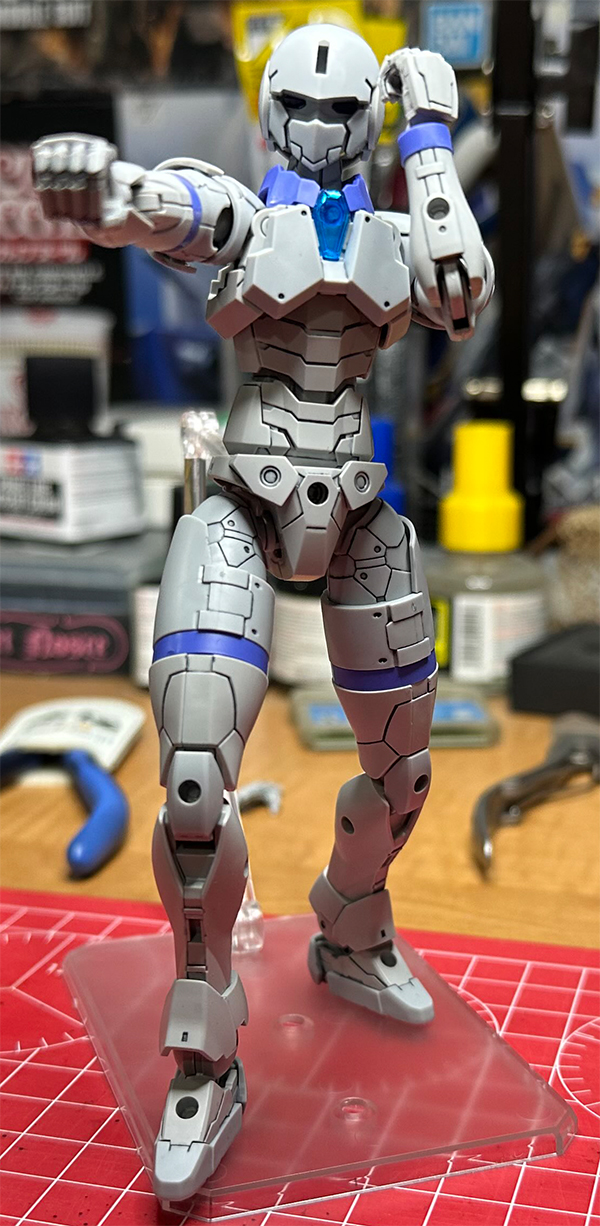
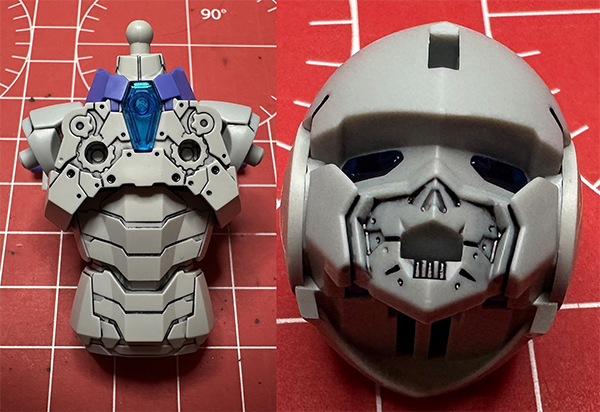
The Liber Holy Knight and presumably the other kits in the 30 Minute Fantasy line feature a surprising amount of detail when compared to previous entries in the 30 Minute kit line, including plenty of panel lining and intricate details which are only expected to be seen when you are swapping parts between the three stages of the build. While much of this detailing is not visible on the final product I am quite happy with this as the additional greeble on these parts makes them vaulable for kitbashing assets and just generally improves the build experience.
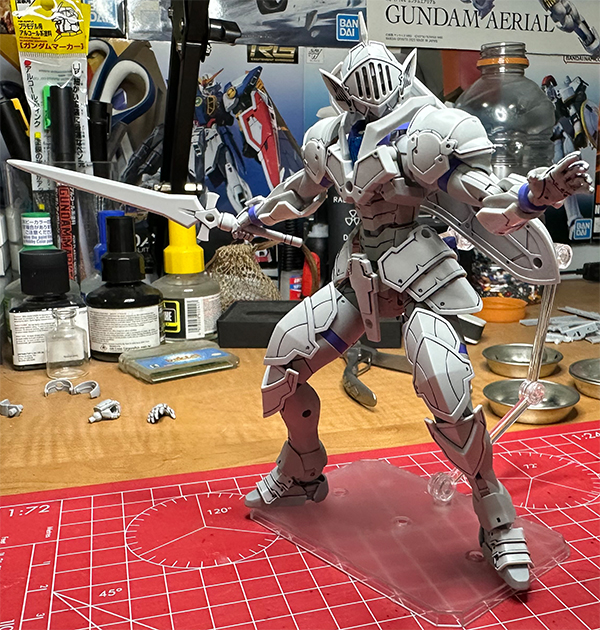
After the initial 'silhouette' form is complete, the second stage begins. This stage includes the knightly armor, sword, and shield. It is at this point that everything really comes together. The armor layers very nicely onto the base figure and as if by magic does not significantly interfere with the articulation. Even with all this bulky gear equipped this little guy can pose in ways which rival the RG God Gundam kit. This posability is in my mind what really makes the 30 Minute Fantasy line shine.
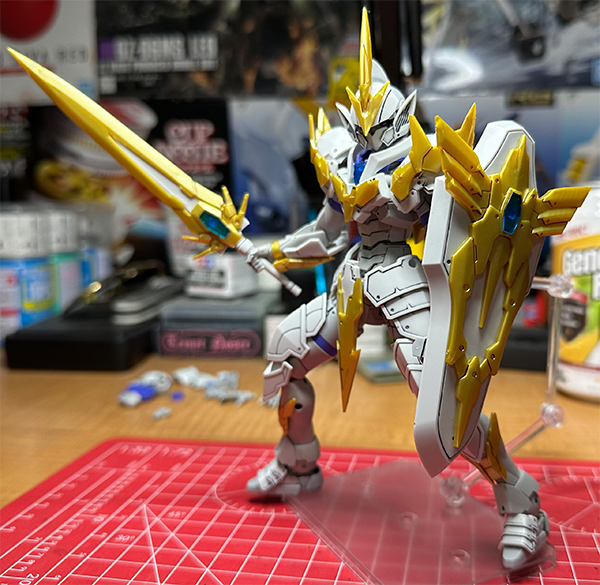
The final stage of this particular 30MF kit replaces a few pieces of the middle stage knight armor and adds a significant amount of gold detaling which serve to bulk up the kit and make it appear larger and more imposing than it is. These parts serve very well in that respect. In addition to the gold are a few more of the transparent blue parts, each of which sit atop a wide and flat area which if hit with a touch of panel lining marker give the illusion of gem-like facets. It is on these gold parts that the poor gate placement once again rears its ugly head, as even with all the filing and buffing in the world, Bandai's metallic flake gold simply appears a muddy yellow yellow anywhere plastic has been injected via a gate. Despite the inconsistent finish the gold isn't terrible out of the box but could do with a quick spray from the Gundam Marker Airbrush System or indeed any airbrush. Further, a chrome or gunmetal on the stage 2 armor and much of the silhouette portion would in my opinion really make this kit pop. Keep an eye out for that in a future update as once the ever-growing pile of kits is no longer consuming my entire closet I just may revisit this one.
High Grade MS-06F ZakuII F Type Solari [RFV]
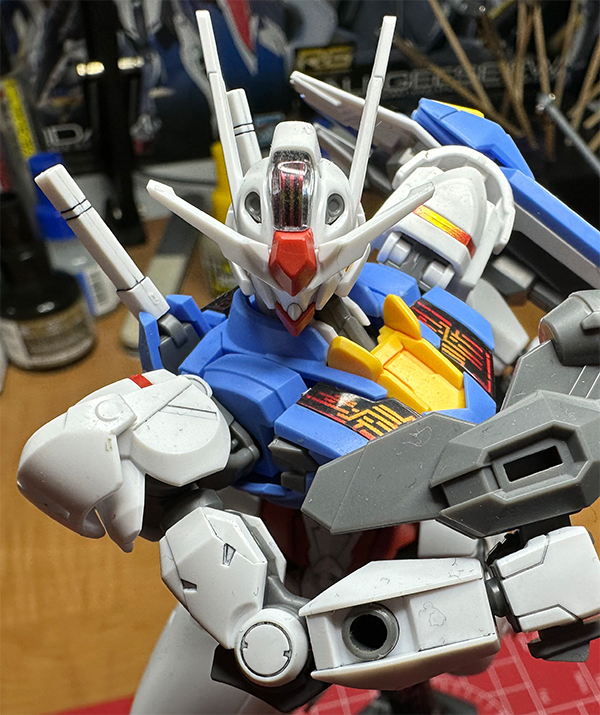
Wowzers, this one took me a while longer to complete than I had hoped! Life has a way of interfering with one's hobbies, it would seem. Regardless it was a really fun build, which I completed while listening to a few episodes of the On the Shoulders of Giants mecha podcast! (Not sponsored, just a great accompaniment to being queer and building mecha models.) I will start off by saying I have enjoyed building this kit, and its final result more than any other Zaku I have ever built. Forgive my blasphemy, but I have never really been a fan of the Zaku... until now! Every single surface of this kit is absolutely dripping with a level of detail previously unseen on High Grade kits. The amount of panel lines, bolt holes, and greeble on this thing is wild. The tolerances on this kit are extremely tight. While there are a few visible seam lines on this Zaku, a great many of them effectively disappear when the parts are seated together... Which can take a bit of force. That's really my only complaint about this kit, sometimes during assembly you have to put a whole lot more force than feels comfortable into getting parts snapped together. There were a few points where I was sure I was going to break something as I was assembling the torso specifically, but as it turns out it's quite sturdy.
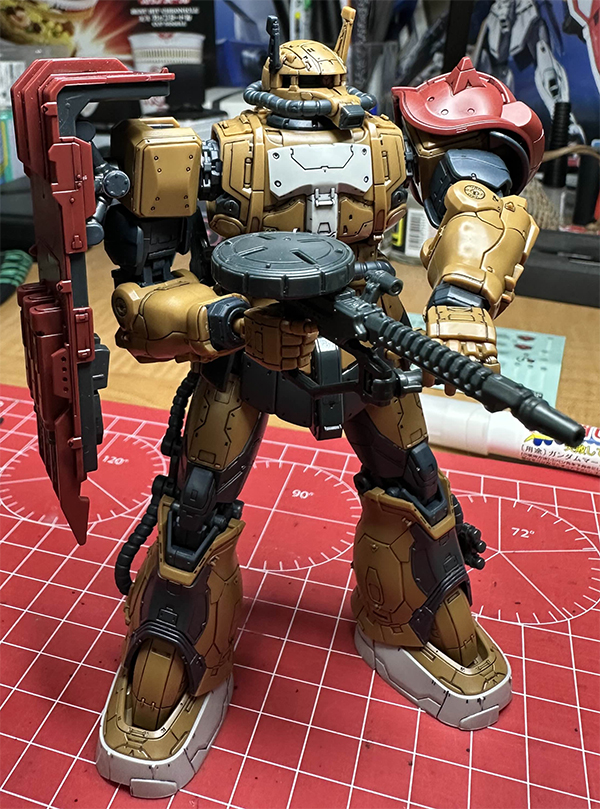
What this kit lacks in gimmicks, it makes up for with its unparalleled level of detail. It is a rare thing indeed to see a 1/144 scale kit with such intricate panel lines, and what's more these panel lines and fastner holes are quite deep as is. All too often on HG and even RG kits the panel lining is so shallow that it may not hold ink without a bit of scribing, but none of that is needed here. I was able to use a standard Mr. Hobby pour-type panel lining pen and wipe away the excess without ever having to re-touch any of the lines or other indentations.
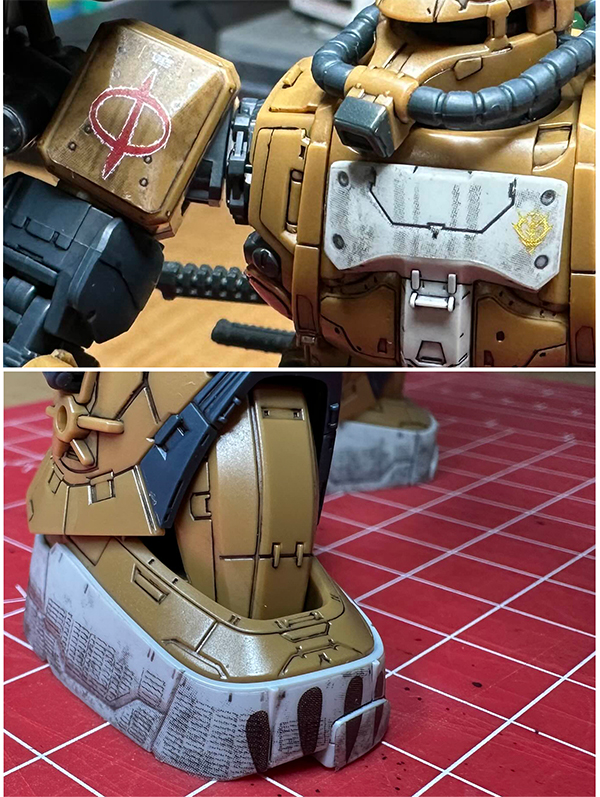
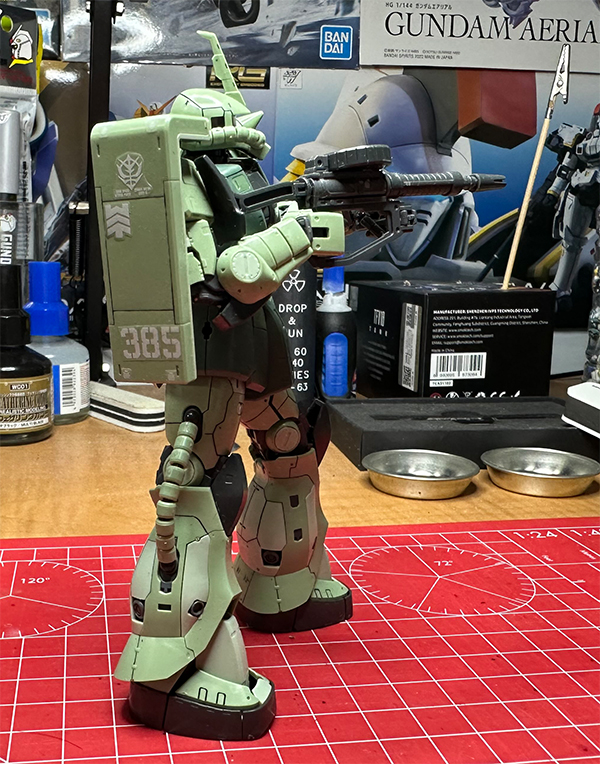
Bandai has brought something new to the table with this kit, in the form of pre-weathered decals! I don't believe we've seen such a thing elsewhere on a standard kit release, especially a High Grade apart from the Gundam counterpart kit from the same series released alongside this one. If I'm wrong about this, feel free to correct me by way of a comment on my guestbook or neocities profile! These new decals also seem to be a slightly different material and thickness than those I'm used to seeing from Bandai as well. Unlike the decals of old, these feel a bit thinner and more stretchy. Where we would have had bits failing to stick on curved surfaces (I'm looking at you, RG Crossbone chest emblem) these can be massaged down into place almost like a vinyl car wrap for edge-to-edge coverage. While I'm not sure how I feel about the stickers having a pre-weathered appearance (though it sure does make me want to do a full weathering pass on this kit), the way these adhere to complex surfaces is a very welcome change indeed. I will note that I did not use all of these weathered decals, as I opted to leave out the ones which go on the skirt section. I've also only used a handful of the many included warning labels.
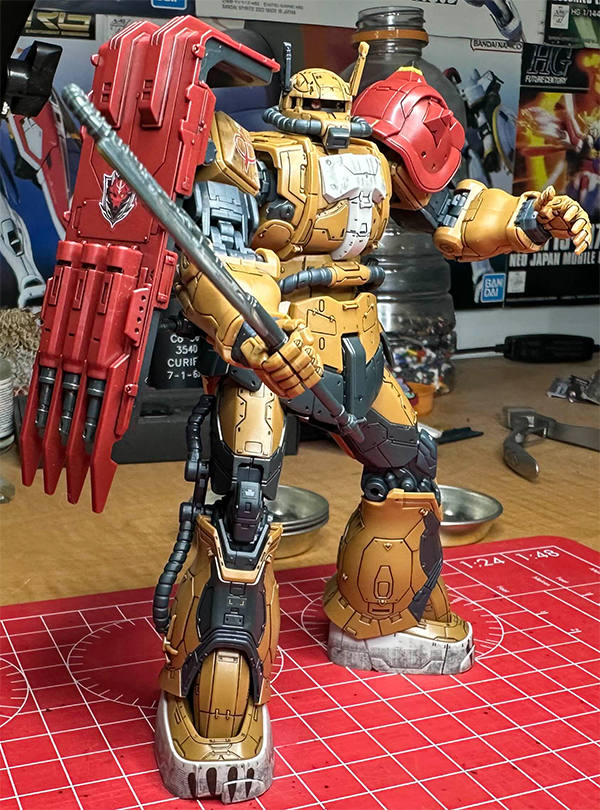
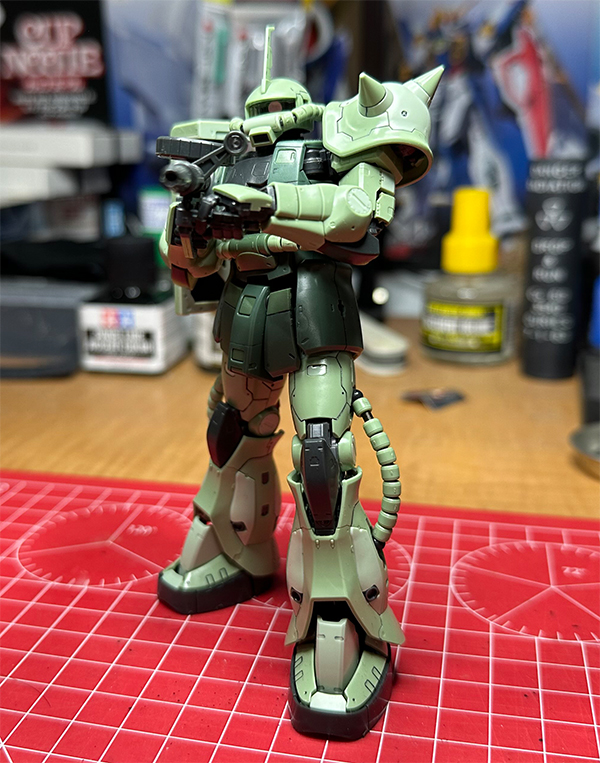
When it comes to posability, it's pretty much the standard fare as far as Zakus go. The rear of the skirt is not articulated, so the legs can't go very far back. The sides of the skirt can fold out, though their front edge will collide with the front skirt unless you swivel that forward a bit on its added hinge. It does have a nice ab-crunch, owing to a change in the energy pipe configuration, and an extra ab joint when compared to other Zaku kits. The energy pipes on the legs are different than we've seen on Zakus previously, and allows for a little wider range of motion ...But the top of the pipes still collide with the skirt and can make some stances a little awkward. Even still, it poses up quite nicely and can look very menacing indeed.
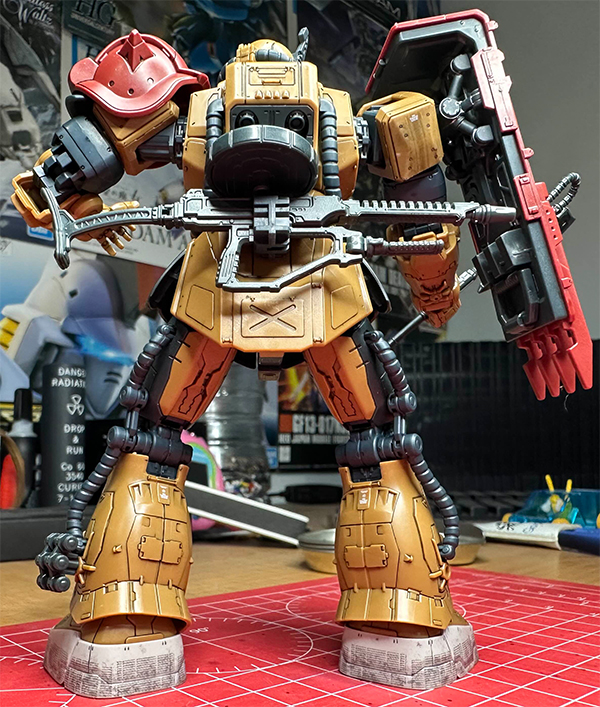
Even the backside of this kit is well detailed! And in another departure from usual Bandai style, they haven't just tried to hide the biggest, baddest gatemarks on the rear of the kit! While there are a few unfortunately placed gates that will need filing and sanding in order to hide, Bandai's made a very good effort at putting them where they'll be least noticeable. Even still, there were a few that I feel Bandai could have improved by making them under-gates instead, but I guess those are primarily relegated to Real Grade and larger scale kits for ...reasons?? All in all, this is a great looking kit and I absolutely adore it. Whether you loved or hated the Netflix mini-series from which this kit hails, it is a joy to build and looks great on the ol' gunpla shelf. For the first, and perhaps last time I can say I would highly recommend this Zaku kit.
High Grade MSM-04 Acguy
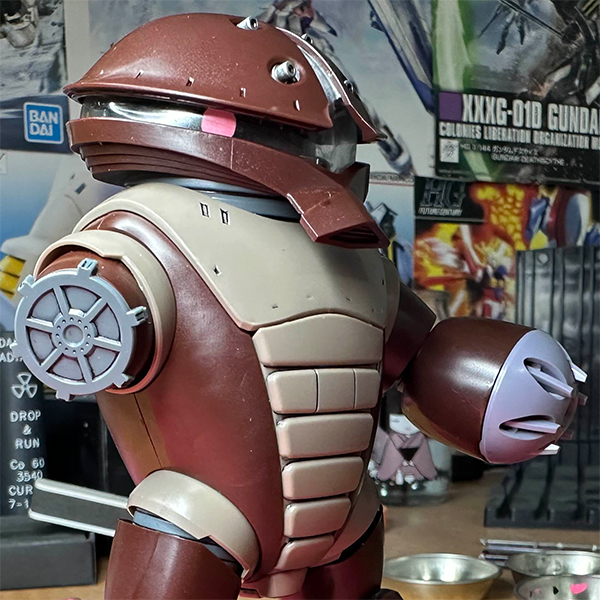
This little kit is an interesting one! Hailing from the distant year of 2007, it's an older high grade kit so it has a few issues common with kits of that era but overall it's a good one! It may be a bit lacking in gimmicks, but it makes up for it with a surprising amount of articulation despite its bulky appearance. The kit I recieved appears to be from the original print run in 2007, and unfortunately some of the gray plastic hasn't aged well as there is some minor cracking on the backs of its knees. Its color accuracy and separation is quite accurate, and it seems to have most of the detail that would have been seen on-screen.
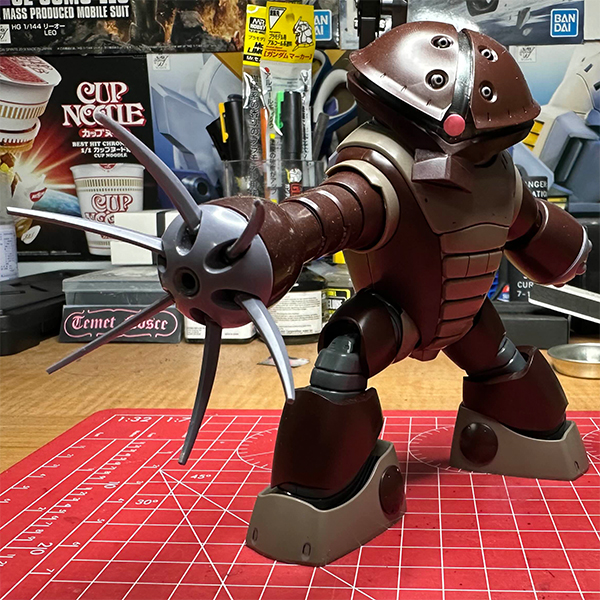
Posing this kit is relatively easy, though it's not entirely without issue or annoyance. The arms and the extensions for them use a ball and socket joint, some of which are tight and some of which are not... This means that getting them to hold in certain positions can be a bit tough, but applying a little strip of tape or some nail polish to the ball can help tighten it up in the socket. The light brown shrouds at the shoulders and hips are also very loose and so they'll move around of their own accord, making it a tad difficult to get them into position. On the up side, this kit's got very chunky legs and wide feet that make it so it can readily balance on one foot if need be.
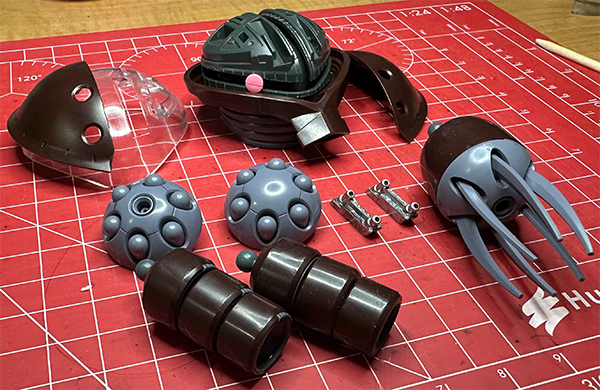
It comes with some extra arm pieces which can be used to extend both arms a little bit or extend one arm a lot, as well as a few different hand weapon attachments. As for gimmicks, the kit really only has one in that the head can be disassembled to move the mono-eye into whatever position one desires. This isn't the easiest process, as the guns seat pretty tightly in the head and they prevent the removal of the clear dome piece. If you paint these and intend to remove them often for re-posing, I would suggest a tough topcoat so that the paint doesn't get damaged. The eye can be pushed around a track in the head with relative ease, I do this with the tip of a pair of tweezers or the wooden end of an aligator-clip paint stick.
It's even got a plate to replace the lower arm in order to replicate a specific Acguy seen in 08th MS Team! Being that this kit is so quick and easy to build, it'd be a good one grab a few of in order to create a small squadron diorama. Given its bulkiness, it'd be a good canvas for some weathering as well.
Gundam Gashapon Roundup!
It's been a while since my last post! I've been pretty busy as of late, so I've not been dipping into the big ol' pile of kits as much. In fact... it seems that pile only ever grows. This isn't helped by the fact that I recently picked up some interesting Gundam themed gashapon sets! Technically they aren't really Gunpla, but they are certainly gunpla-adjacent. So come along with me on this journey as I share some photos and we discuss these little things.
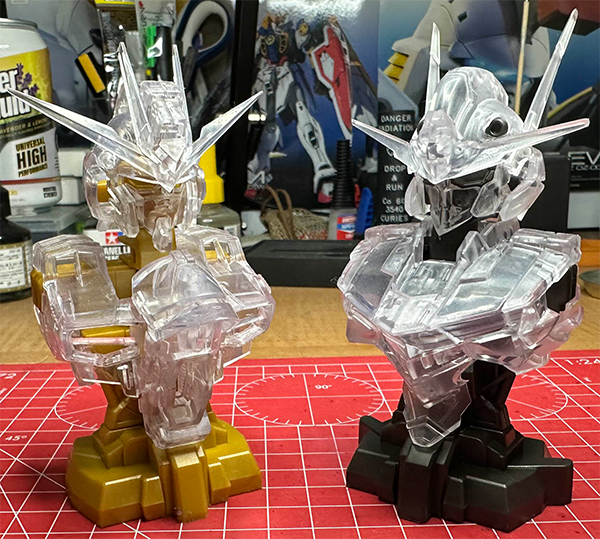
The first thing I picked up were these MS Mechanical Bust sets. They had a few variants in each set, as is always the case with Gashapon. Each had the chance of a few clear busts with differently colored internal frames, a screen-accurate colorized version, and lastly a more detailed internal frame complete with LED componenets but no external shell or armor. The detailed internal frame is meant to be combined with the screen-accurate colorized version in order to create a fully detailed mini-bust. Of course they do this in an attempt to sell more from the same set, and it would seem the clear versions are the most common. At first I wasn't a fan of the clear shell, but I've since come around and I think they look pretty neat! I'll definitely be topcoating them with a bit of a matte finish and maybe the slightest of a weathering wash to help bring out their details a bit better.
I think this Exceed Model Zaku Head might be my favorite! It's in 1/48 scale, so the same as Mega Size gunpla kits. I find it really interesting that they used part of the head and part of the neck/stand as parts of the capsule in order to be more effecient in packaging. This Zaku head is fairly well detailed and even features opening portions, one of which allows access to a knob which rotates the mono-eye. This one could definitely do with some panel lining as well, and maybe evening a lighting mod.
This little Gundam Pharact is from the Gashapon Senshi Forte set number 16. It's a bit different from the others you'll see below, and I think it predates them. It shares many similarities but it stands a bit shorter, has more SD-like proportions and is a bit less articulated. Even still, it's got plenty of detail despite its size! hangar style stand it is on is from another capsule in the same line, which contained a number of other accessories (More on that later). This one also had even less detailed instructions than the following kits, which isn't all that bad being that they're so simple.
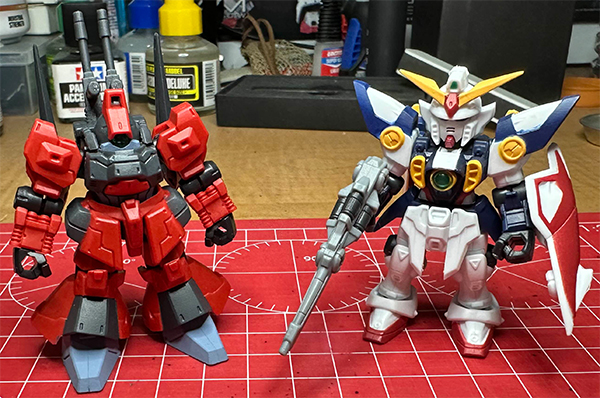
These four little guys are from a few different Mobile Suit Ensemble lines. They're surprisingly well detailed and color-separated considering their size! They could definitely do with some panel lining, which I've been hesitant to do because the plastic these are made of is different than the usual polystyrene that normal gunpla kits generally consist of. It's much softer, and has some interesting properties. Since the kits are stuffed into a little plastic ball, they have to be able to bend and will often remain bent once removed from the capsule... But apply some heat by way of submerging them in some hot water or give them a blast with a hairdryer and they'll magically re-form to their factory-fresh unbent shape! While this is really cool, it does mean that this is not the kind of plastic that my panel liner pens are specifically made for, and there is a slight chance it might crack or melt if it doesn't get along with the chemicals in those pens. What I've done is saved a few clippings of the runners (yes! These kits have tiny runners!) and given them a few dabs with the panel liner to then set aside and check on over the course of a few weeks in order to see if the plastic holds up. If it does, I'll revisit these and give them a once over. I may also go about cleaning up their paintjobs a bit as rather than being entirely color-separated plastic as gunpla kits often are, these do have painted parts and those paints aren't perfect from factory.
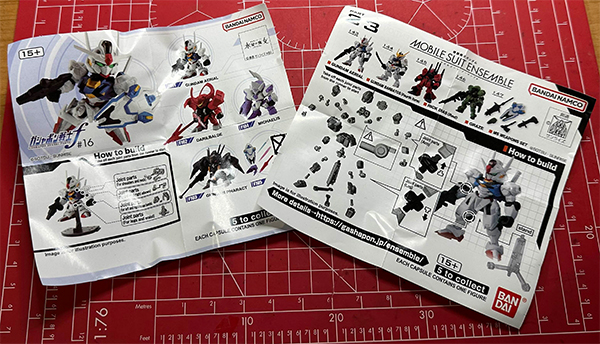
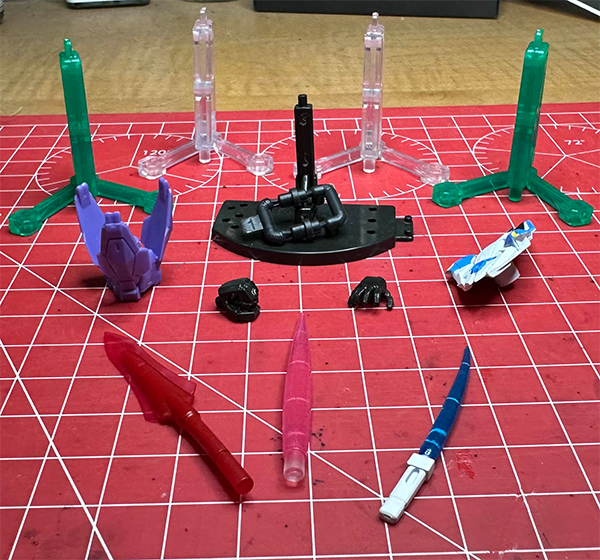
The only real challenge with these kits is that their instructions aren't brilliant and a lot is often left up to just referring to the photo of the finished product... especially if the kit you got isn't the hero of the set, as they don't print unique instructions for each different one and just kind of leave you to figure it out yourself. Each kit does come with its own little stand, though you don't really need them as they'll stand up on their own just fine but it's neat to have for flying poses! Some kits come with a few extra accessories, and each set has one or two capsules that are entirelly just full of accessories. Those seem rarer though, as I've only gotten one so far. Maybe I'm just lucky!
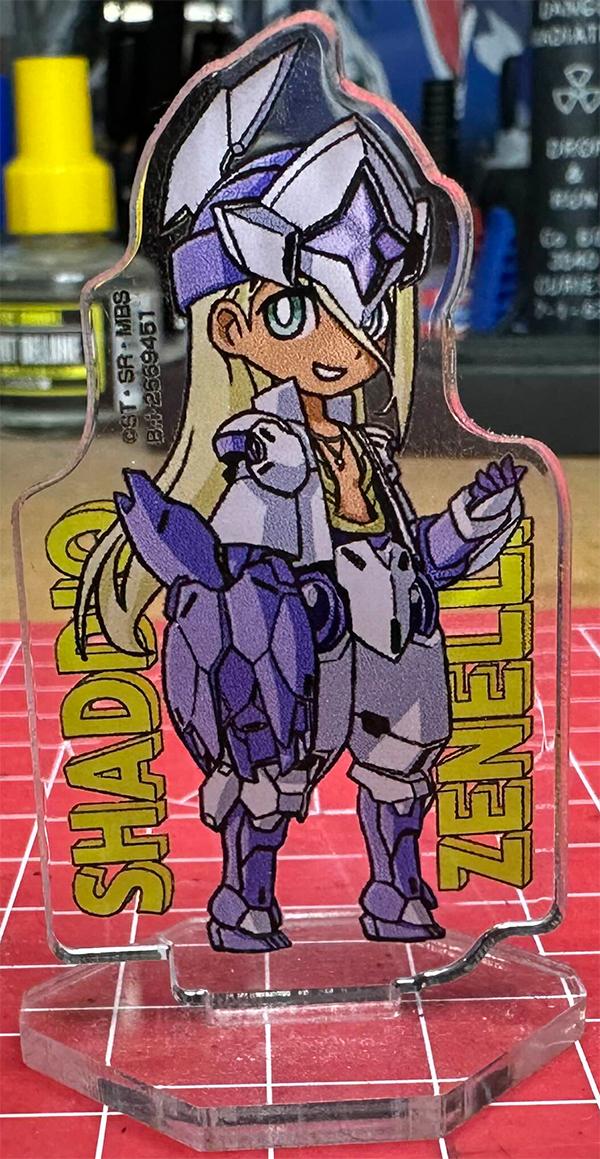
Mini kits aren't the only thing you'll find gundam-wise when it comes to gashapon. There are keychains, mini acrylic posters, and little gundam girl standees like this one! Outside of Japan, these Gundam Gashapon may be more difficult to find but Bandai has a few official Gashapon shops in the United States which are permanent, and they seem to do pop-up stores here and there. They're definitely worth checking out!
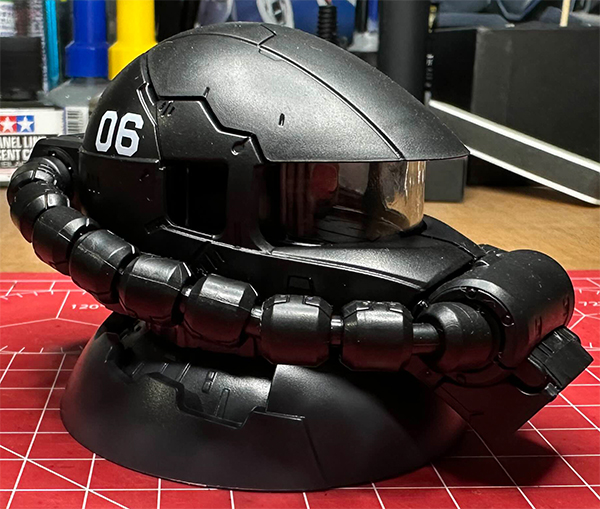
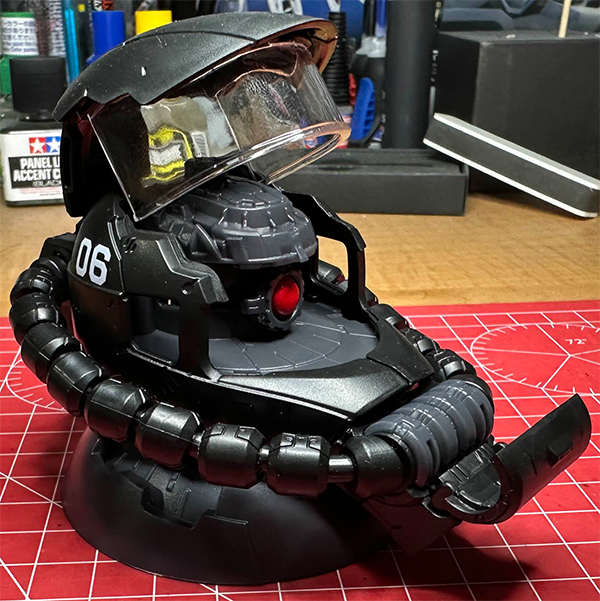
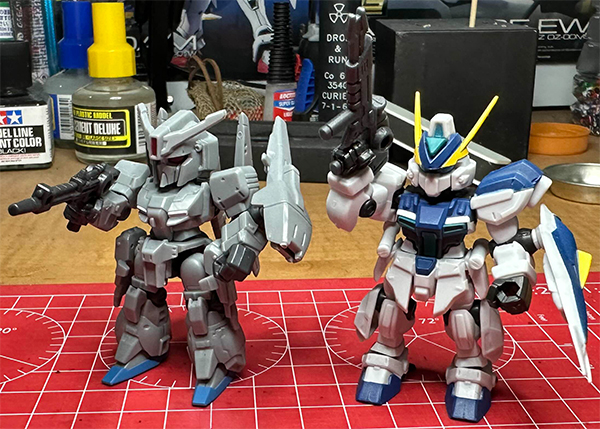
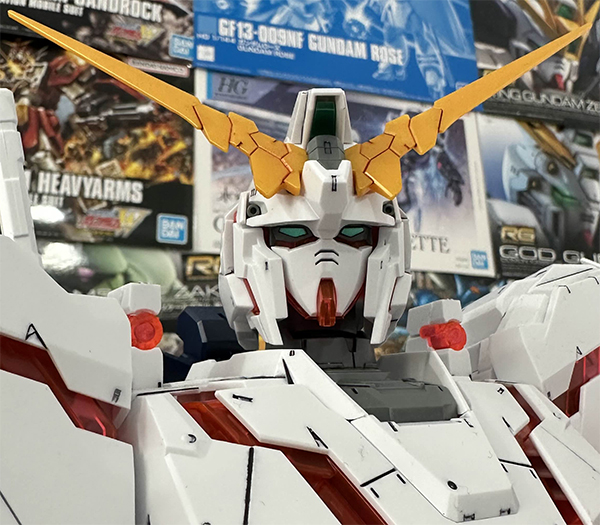
Mega Size Unicorn Gundam [Destroy]
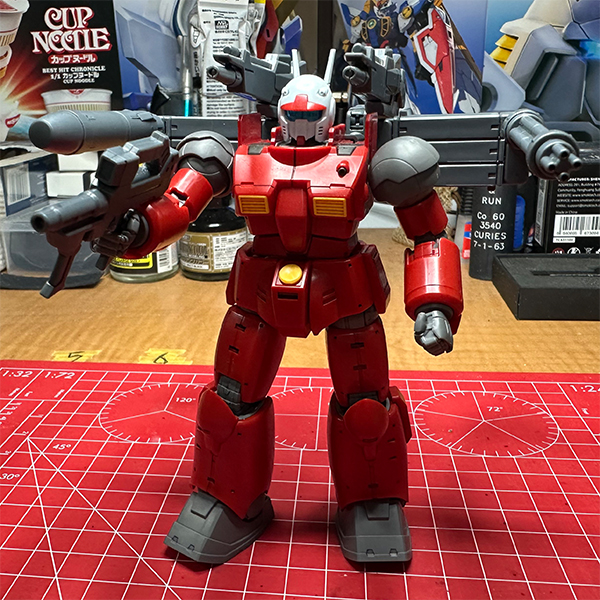
I finished this kit towards the end of July and intended to do some more work on it before posting anything, but it's been a few months since my last post and I am far from finished working on this thing so I figured I might as well write something up about it. First of all, this thing is massive at 1/48 scale. In the pose I've put it in it stands at 62.2cm. In Freedom Units that's like three washing machines or something. Real talk, this thing makes Perfect Grade kits look small. I don't have a Perfect Grade kit to compare it with, but below you can see it with a 1/144 scale Real Grade kit. The difference is absolutely wild.
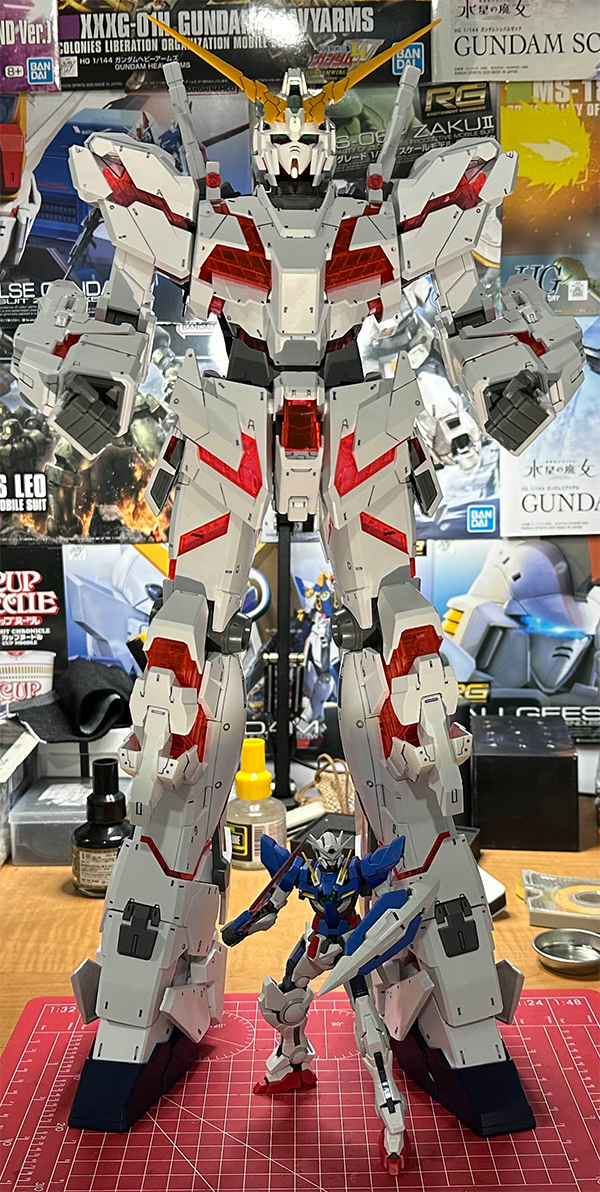
Detail wise these Mega Size kits aren't really mind boggling out of the box. All I've done is some simple panel lining but the more effort one puts in the better the result. Without putting extra effort in, these kits land somewhere between a High Grade and a Master Grade. There's unfortunately a lot of seams and a whole lot of nubs that need sanding off. Honestly though, these Mega Size kits are meant to be seen from afar rather than up close. This is the kind of kit you put in your window so that Gundam fans driving by can marvel at them from blocks away.
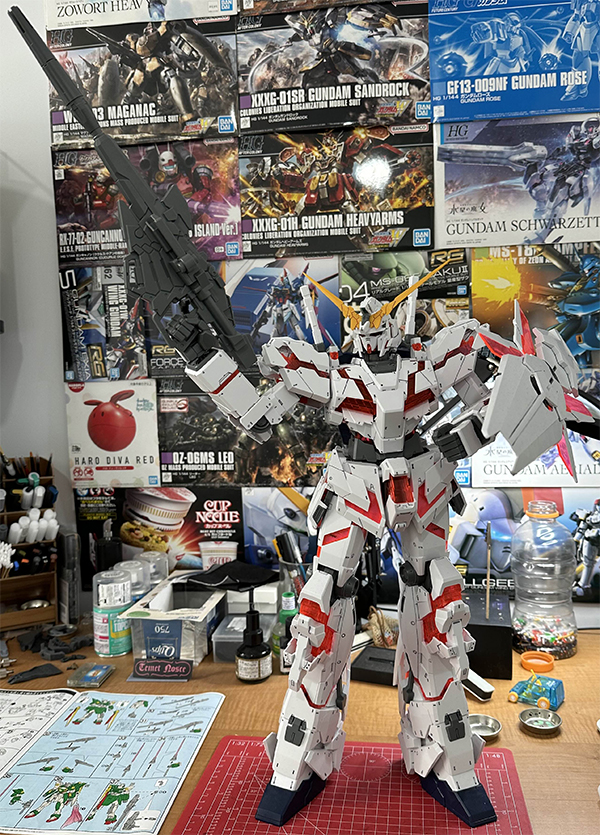
Of course this kit isn't wihout issues, and the articulation is abysmal. The High Grade version of the same mobile suit is much better articulated, and it has much better gate placement to boot. Even still, this is an awesome kit if for nothing but its imposing scale.
UPDATE: Minutes after putting this thing back up atop the display case it decided to dive onto the floor and destroy itself. Parts scattered everywhere, total carnage. Fortunately the only damaged part was the V fin and it just needed cementing back together. This highlights something I forgot to mention... its poor articulation leads to the kit being very unstable. It's near impossible to find a pose that feels safe in such a way that it won't fall over.
Update 2: It jumped off the shelf AGAIN. This time even more parts need gluing... oof. I need a stand or something for this kit.
30 Minute Sisters Siana-Amarcia Vivace Form
Woah, This one's not a gunpla! Wild, I know. I thought I'd give this one a go because I wanted to see what else the "30 Minute" line had to offer, and this looked like an interesting entry. At first I wanted to build this as simply as possible, without any of the usual filing and buffing to mitigate nub marks, and keep panel lining to a minimum as these are supposed to be very basic kits but that idea didn't last for reasons that will soon become apparent. Overall I really enjoyed this kit, and the potential for modification is great. While it's obvious that greater care is taken in the design of gunpla than kits in the "30 Minute" line, this one isn't bad!
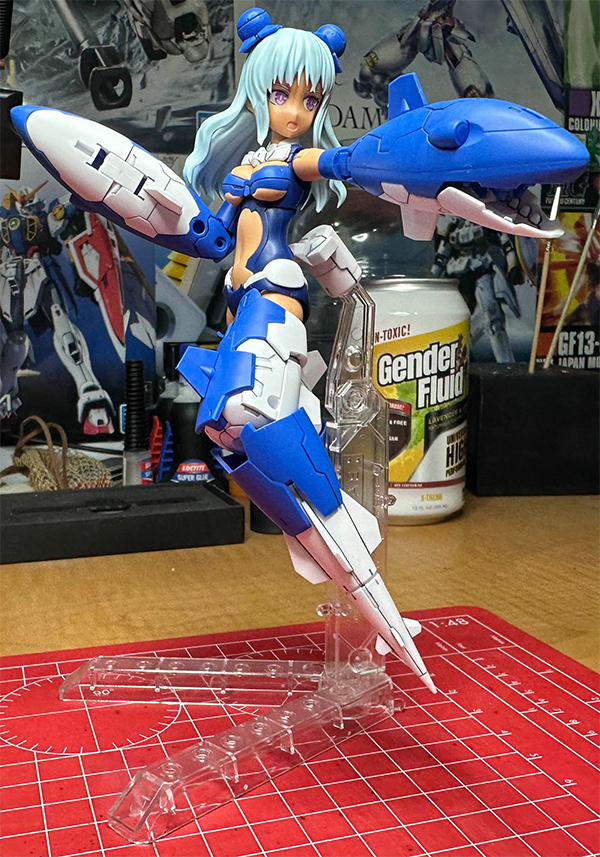
As I understand this kit differs from the majority of 30 Minute Sisters kits in that it comes with full replacements for the arms and legs which turn them into thrusters/weapons, whereas the average 30 Minute Sisters kit includes only a set of humanoid arms and legs. I couldn't let these go without a little grey panel lining. I also had to file some parts on the shark arms because of some very poor gate placement.

I'm not sure what they were thinking when laying these parts out on the runner, but there is a gigantic gate on a prominently visible and curved surface for the elbow of the shark arm, and on each of the shark arm eyes there is a thick gate dead-center on the front of the eye itself. These gates could have gone just about anywhere else on these parts and it would be no bother at all and the whole kit could effectively be built with two cuts per gate and no cleanup but instead we get this.

It's certainly not all bad news, though. This kit also includes humanoid arms and legs, a plethora of adapters for adding accessories from 1/144 scale gunpla, 30 Minute Missions mecha, and other 30 Minute Sisters kits as well as six pairs of hands for a decent level of customization. Also included are two painted faces, and there are other faces available as well. While this was overall a fun build, I'm not sure I'll be revisiting the 30 Minute Sisters line often. There's nothing wrong with them, I'm just not much of one for posing organic humanoids. You can hide a lot of crimes in mecha poses before entering the uncanny valley, these not so much.
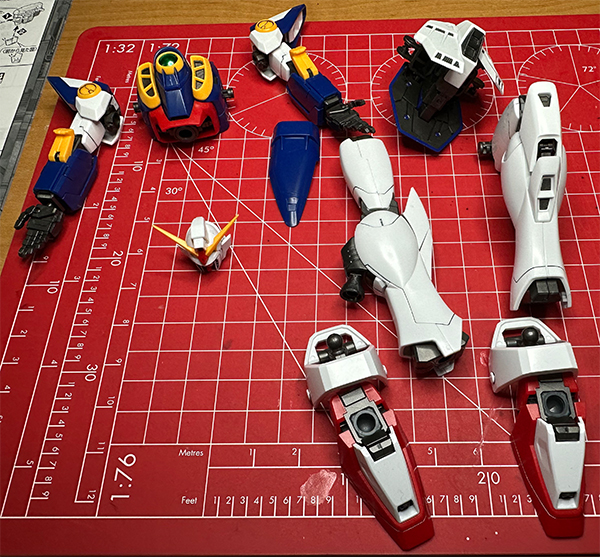
Master Grade Gundam Heavyarms EW
This one took me a while to finish, though not because it was particularly complicated or challening. Interinally it's pretty similar to the others in the Maser Grade Gundam Wing EW line. It's the closest thing we've got to a Master Grade of the Heavyarms TV version but unfortunately with its one and only gimmick it falls a little short of that mark. We'll start with the good, though! Bandai's done well with color separation on this one, with very little paint being needed to make a few parts pop. I painted the 96 missiles with Gundam Marker GM13 grey-blue to set them apart from the other grey parts on the suit, and used XGM05 gunmetal on parts of the shoulders and the main structure in the chest. For the knife, chest guns, and the tip of the gatling gun barrels I used the good ol' XGM-100 Chrome Silver. The kit comes with plenty of decals, hardly any of which I have applied yet and even a sheet of dry-transfers. The articulation is pretty good despite its chunky form, and with the big heavy accessories it'll still hold its poses well. The only real downside to this kit is that the gatling gun is held instead of replacing the forearm as seen in the show. The designers of this kit obviously thought about this, as the one gimmick the kit has is a part-swap for the left forearm that replaces it with the beam saber holder as seen in the show when the gatling gun is ejected. So... if the arm-mounted gatling gun is something you really must have, you will have to 3d print an adapter yourself. I grabbed one online, but I'll have to tweak and re-print it because it was set up for an FDM printer with wide tolerances so it doesn't fit well on my kit as I use an MSLA printer. I'll be sure to post an update and a download for a modified version if I ever get around to it!
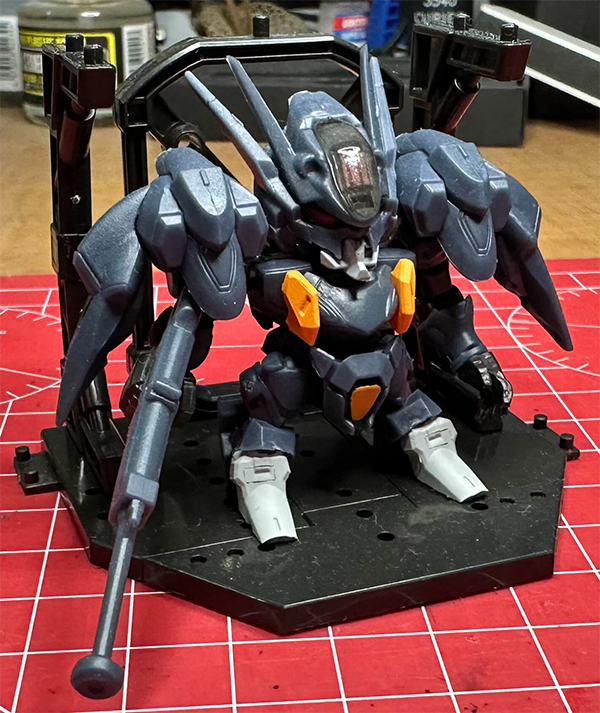
High Grade WFM Demi Barding
I haven't made a post in a little while as I've been very busy but rest assured, I have a neat Master Grade kit in the works! In the meantime, It's WFM Wednesday! Yep, another Witch From Mercury kit I finished a while back and which has been quietly collecting dust in the display cabinet. I've got the other versions of the Demi suit as well as the weapon expansion set. I'd planned on using the expansion set and the other kits to make something of a combat-sport squad or something but like many things that one's fallen to a back burner. Anywho, without further ado let's get into it! First and foremost, I appreciate that there's a good bit of color-separation on this kit. Sure, there's a few color-correcting stickers for the shoulder thrusters and some foils for the chest, gun and backpack cameras but it looks alright when simply snap-built. A bit of panel lining could certainly help and a dab of paint here and there would make quite the difference. The articulation is okay, though its chunky legs, leg-boosters, weird skirt section and big honkin' forearms do get in the way here and there. It also can't turn its head very far as there are little nubs which protrude from the bottom of the head and collide with the armor when turning. I'm also quite pleased with the eyepiece in the head as rather than using a foil it is in fact a translucent green plastic, easy LED modding! The backpack is this thing's party piece, though.

The backpack detaches and becomes a little drone connected to the suit via a little cable and complete with two cannons. This thing gives serious Build Fighters vibes. It's even got the standard dual 3mm peg connector, and the peg on the end of the cable is also a 3mm peg, so this could be used cable and all with pretty much any other High Grade kit. The cannons are on rotating rings and also have a second pivot so they can point forward, rearward, above and below the drone but they can't face in or outward from center. The little barrel things on either side which the thrusters are attached to can rotate and tilt a bit in any direction which adds a lot of personality to this lil' guy. I'd say it's almost worth grabbing this kit just for the characterful backpack drone.
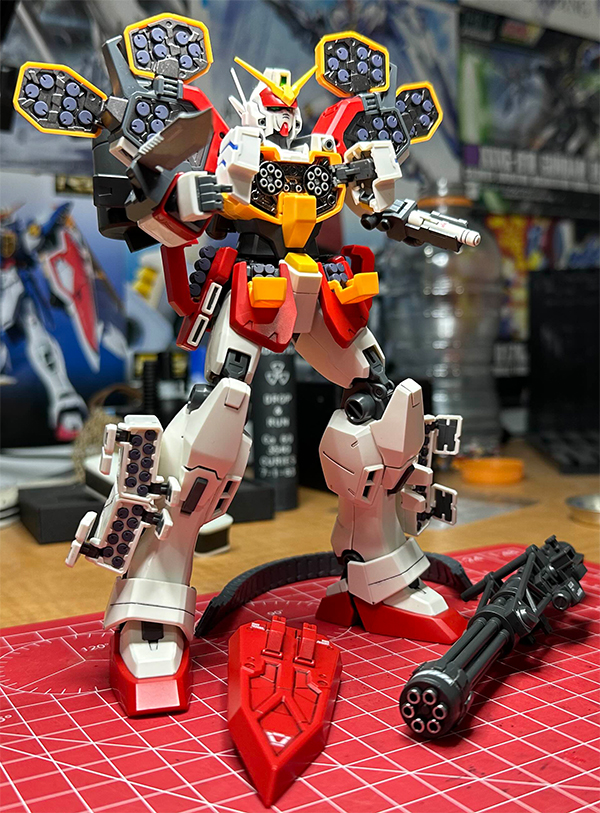
High Grade Build Custom Giant Gatling
I've got a whole lot to say about what is at the end of the day a very simple kit, so I'll do my best to break up the wall of text with a handful of photos. I will start off by saying that normally I don't like add-on or accessory kits that are made of a single color plastic, or which require painting to look any good but this one is an exception. Yes, every part in the kit is made of the same dull gray. Yes, I painted every part in this kit with the exception of a few accessory parts I plan to save for use on other kits. And yes, the gray I used to paint the majority of the kit is almost exactly the same color as the plastic it covers. Could I have gotten away with only painting a few parts here and there in different shades of silver or gunmetal? Probably.
This kit has a lot of little details which I felt needed to be different colors, so I found it necessary to do multiple different coats on some parts, while masking off parts previously painted a different color. This worked really well for the most part but I did learn a few lessons about surface prep and the deceptively strong adhesion of my choice masking tape. In the end I did have to re-touch a few areas by hand, which I did using an extremely fine brush dipped in small dabs of paint from a Gundam Marker.
Of the five colors used during this build, three were used most heavily and the other two barely at all. The vast majority of the kit is covered in GM12 Gray, which I had thought was going to be a bit lighter in color but was so similar to the plastic that it was actually difficult to see when applying it. My longtime favorite marker, XGM100 Chrome Silver was used to coat the barrels, legs, and a few other details. Unfortunately, this color looks best without any topcoat as even the glossiest of gloss topcoats will kill its perfect mirror chrome effect, but the topcoat was necessary as I had to mask over some of these chromed parts which would have done worse damage to the finish alone. It looks fine with the gloss topocat, just not as mirror-like as it could. To bring some more variation into the mix, I hit the scopes, a few panels and some inexplicable rods with XGM05 Gunmetal. Lastly I used a splash of XGM06 to give one of the scope lenses that classic Gundam camera green, and a few rings of GM07 red around the ammo carrier to break up the gray a little.
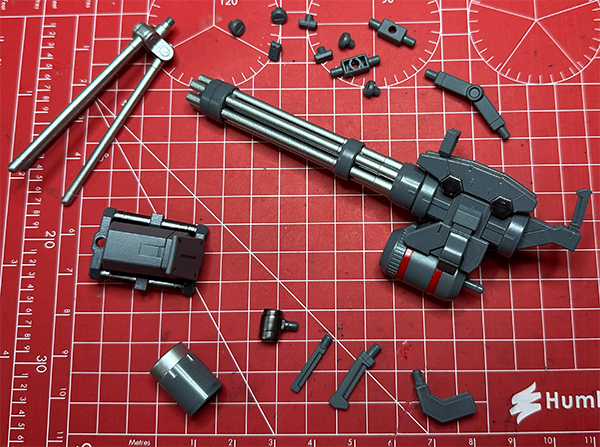
This kit is a goldmine of bits and bobs. The whole thing is modular and covered in 3mm peg and hole adapters. Not only can all these parts be used on this kit, but can easily work with pretty much any High Grade kit, many Master Grade kits, and all 30 Minute Missions kits. It's got little round and rectangular pieces that can be used to hide holes, and plenty of useful greeble to add detail to otherwise visually uninteresting surfaces. It's even got two different grips to fit 1/100 and 1/144 scale mobile suit hands.
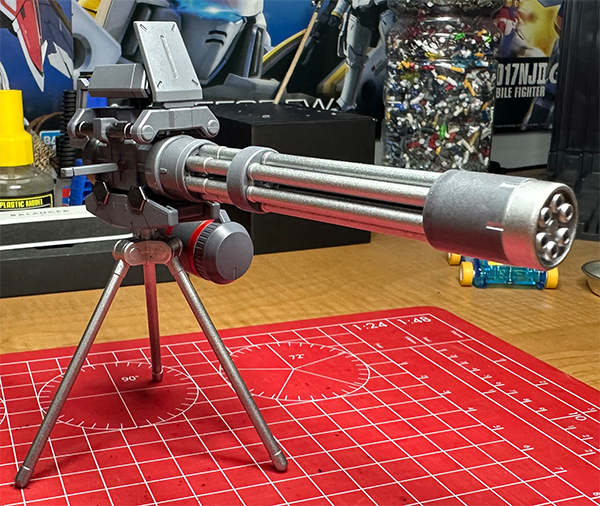
The way the core of this gatling gun is designed means that there is really no wrong way to configure it, which offers a very high level of customization. It works well as a sentry, a handheld weapon, or vehicle-mounted turret. There are a few parts here and there that I wish sat a little more snugly against others for a more flush fit and cleaner look but overall I really don't have much to complain about with this kit.
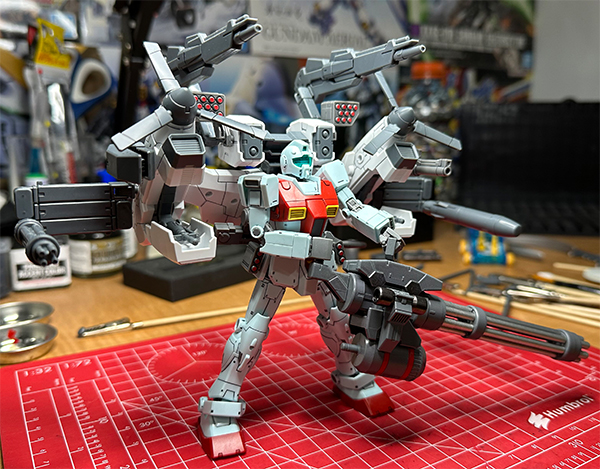
The only real downside is the size of the thing. On a 1/100 scale kit it would be a bit more reasonable and less ridiculous, but on a 1/144 scale kit it's massive. You almost have to balance it out by putting equally large and over the top accessories on the back of your mobile suit of choice or it ends up looking out of place. I could see it working well with something big and bulky like the Kampfer, though. As far as mounting on a vehicle goes... it still looks gigantic, but I don't hate it. In fact, in this case I think it vastly improves the appearance of the 30 Minute Missions tiltrotor. Makes for a very Gundam Build Fighters looking support vehicle.

High Grade WFM Gundam Aerial
It's WFM Wednesday! Or at least... it's Wednesday and I have a Witch From Mercury kit to share, which I had built some time ago. I will start by saying this kit is very limited in the gimmick department, but it has one which is revolutionary in Gunpla, so it gets a pass there. It was also a treat to build! It's very obvious that the engineers at Bandai put a lot of thought into both the build process for this kit and the final product. All the gates are very well placed, so even if you are just doing a single cut from the runner with a set of basic nippers you won't end up with many nasty nub-marks! It does have a number of decals, mostly for the Permet System and a few for the shield. The stickers for the Permet System are very easy to apply, though the ones on the shoulders can be a bit difficult to keep from peeling at either end. The ones on the shield are rather simple and straightforward as well. When it comes to gimmicks the first is the shield, which can convert into what are known as Gund Bits that can be arranged on the suit or displayed on stands which are sold separately. The second gimmick is the much more interesting one. The Permet System component on the top of the chest doesn't use a sticker... No, it uses something which Bandai has never done before. A thin holographic foil is embedded inside the part, which results in a much more vibrant appearance. This does mean that it looks different than the rest of the Permet System on the suit but being that it is the largest and most prominently visible of them, it doesn't stick out in a bad way. At some point I'll have to change the way I post images here, and make it so that they can be expanded to full resolution because the 600px width doesn't do these kits justice.
Real Grade MS-06F Zaku II
Where to start with this one... I built this quite some time ago, it was perhaps one of the first Real Grades I had built. This kit is a recolor and part-swap of the Real Grade Char's Zaku, and just like that one it is absolutely dreadful. It suffers from all the problems one might expect from an early Real Grade. The build instructions suck, the build process itself sucks, it falls apart if you look at it the wrong way or simply exist too near to it, the inner frame quickly goes loose and it has trouble holding onto its equipment... the list goes on. I think the energy hoses were the worst part to assemble. They're individual green rings which sit around metal springs. The way you're supposed to assemble them is a nightmare. Dang near impossible to do without losing a few and they knew it because they included a lot of extra rings. You're supposed to slide the springs into the rings while they're still on the runner and then carefully cut the rings from the runner without letting the spring move or it will fling the rings all over the room. Once that's done... good luck filing the nubs down because the rings are so small they're difficult to grip and they'll just spin around on the spring. Once it is built, good luck keeping it together. You'll have to re-assemble the wrist every time you swap the hands as the final green wrist piece on each arm isn't actually attached, they're just floating there. Sections on the back of each arm want to pop off every time you bend the elbow and good luck keeping the skirt parts on. It does have one neat gimmick, though, and that is the way the mono-eye is on a fancy geared mechanism that makes it swivel when you turn the head. I could keep going on about what I don't like about this kit, but I think this pretty well sums up my disappointment. At least it looks nice.
High Grade MS-07B-3 Gouf Custom
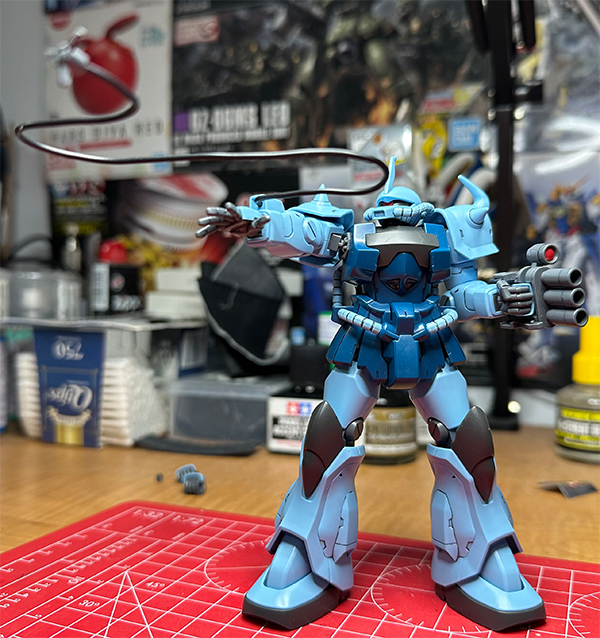
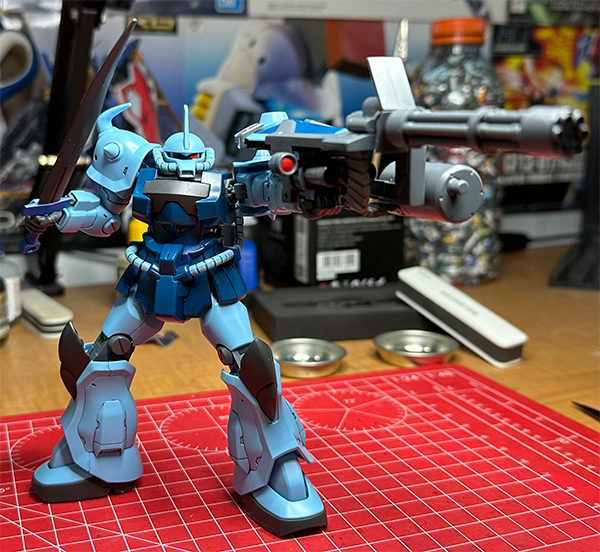
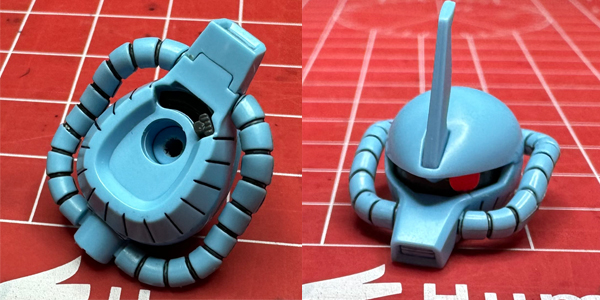
I was very pleasantly surprised with this kit!! I was thinking that since it was a refresh of a kit from 1998 (The runner for the minigun's ammo chain was even dated 1998) it would be very simple and reminiscent of kits from that time. You know, super simple, not particularly detailed, lacking in gimicks. I was wrong, and for that I am glad! Sure, it's not supremely detailed but neither is the mobile suit it is based on. It comes with what you'd expect; the shield, the wrist-cannon, the sword, minigun, and grappling-whip. Where things get interesting is the little details! Among the pictures below, you'll see it has a little slider on the underside of the head so that you can position the mono-eye to face whatever position you like! Not only that, but if you take a real close look at the shoulder joint, you may notice a kind of tab and slot thing going on. I'm not entirely sure this is the intent, but if you are posing the kit such that the arm is held out straight, you can slide the tab into that little slot so that even with the weight of all the equipment on the arm it doesn't sag! How neat is that? While we're talking about articulation it is worth mentioning that the energy-hose that goes from its waist and into its backpack is made of a slightly more flexible material so that it doesn't keep the torso too rigid. It is a bit strange that those hoses and the minigun's ammo chain need to be bent first before they'll fit where they need to go rather than being pre-formed into the correct shape... but it's no big issue as bending them into shape doesn't seem to cause any discoloration in the plastic.
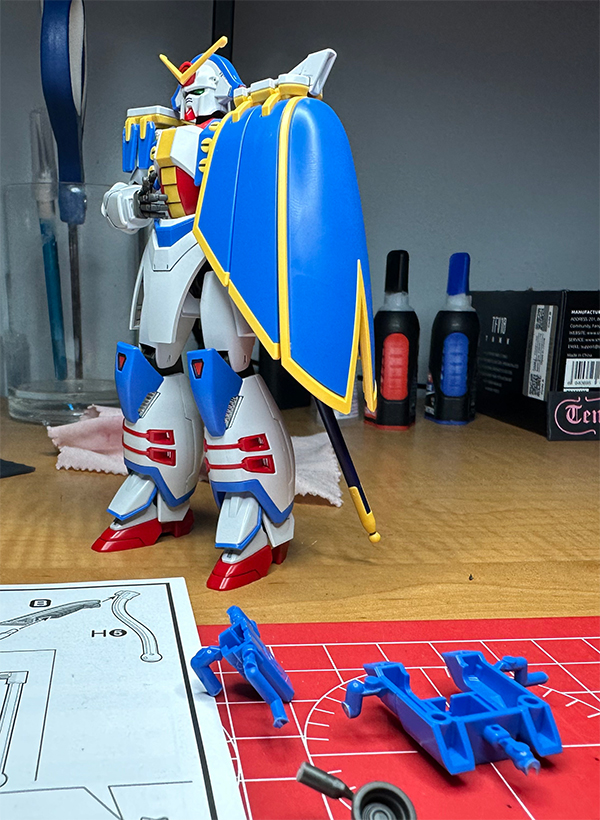
Real Grade GF-13NJII God Gundam
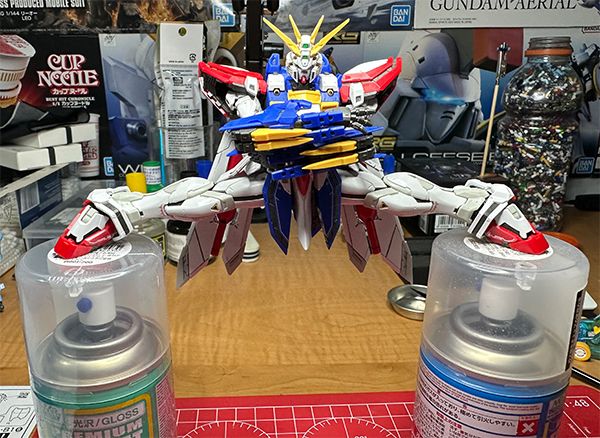
I actually built this kit sometime around late March 2023 and am working on an entirely different kit at the moment, but I wanted to share this one as it really is amazing. I'll try and keep it brief, but I have a lot of good things to say about this one. Being the 37th Real Grade released, it is a wonder to behold. The RG God Gundam has a level of articulation not previously seen in 1/144th scale, and which may even be better than that of any Perfect Grade. It was an absolute joy to build, and it feels infinitely poseable. Even without a stand there is always a way to put this kit into a balanced, sturdy position.
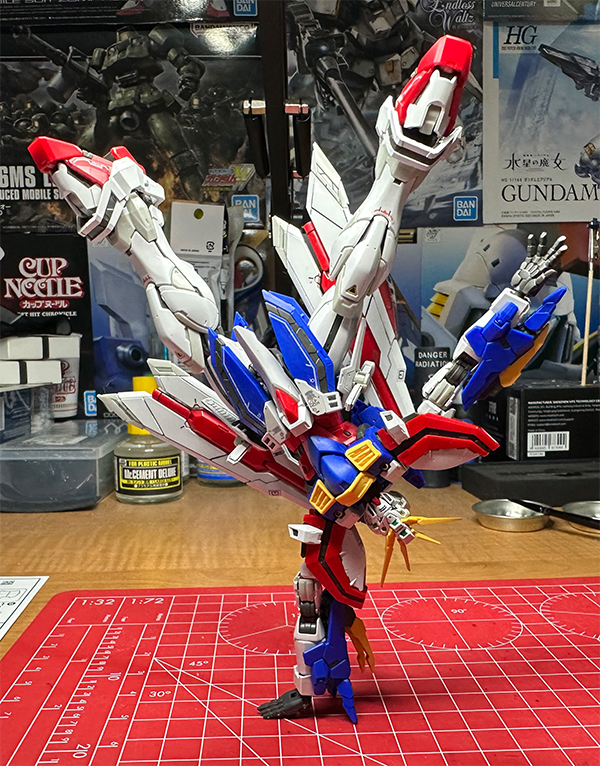
The forearms are articulated in such a way that allows natural wrists positions rarely seen in other kits, and even some of the hands included for martial arts poses have an extra joint beyond the ball and socket to allow even further movement. There really is no end to what you can do with this thing.
The shoulders have extra joints in them that allow for hyperextension and extra degrees of rotation so that you can always wrangle the arms into whatever position you like. The feet can rotate much further than anything else on offer in 1/144 scale, which allows the God Gundam to remain planted at all times. The armor around its ankles is free of points where it will bind, which lets it get much lower to the ground than one might expect. With the legs free of big, chunky armor components the knees offer a full bend and the skirt armor's added degrees of freedom allows the hips to swing out and up for high kicks or low splits.
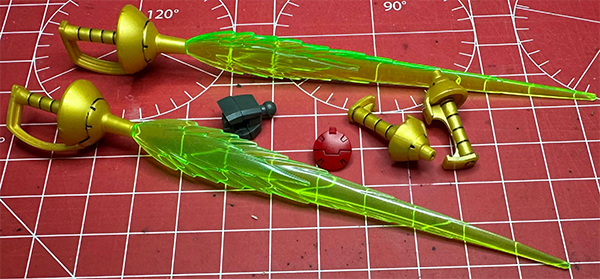
The GF-13NJII carries very little by way of weapons, relying primarily on martial arts prowess. Apart from its head and shoulder mounted vulcan cannons it is equipped with twin katana-like beam sabers. When not in use the saber hilts can be stored on its side skirts. These hilts are the only thing which can interfere with the kit's articulation. When stored on the skirts they may occasionally collide with the fins of the core lander, which then requires that either the lander's fins or the hilt holders be slightly rotated.
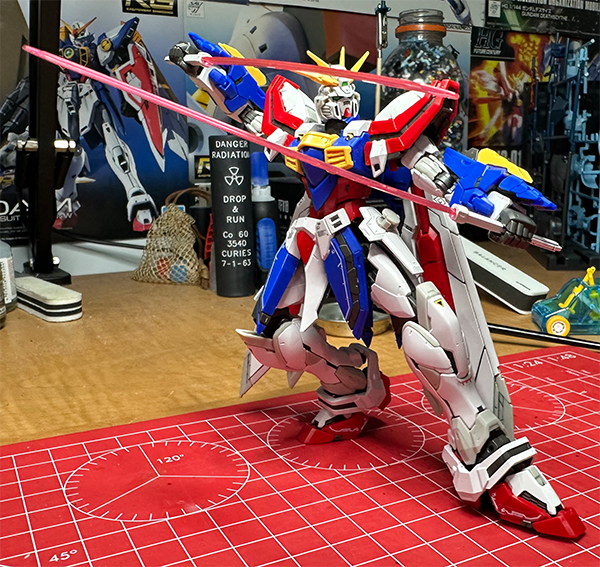
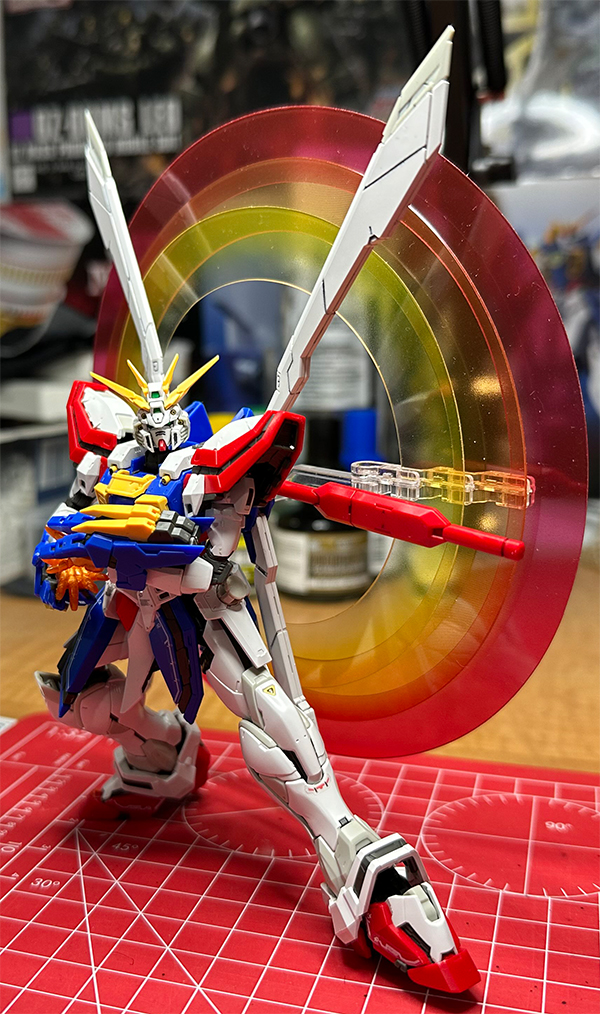
Apart from the various grey holding and fighting hands, three pearlescent orange hands are included for burning/god-finger attack poses. Also included is a rig which connects to the core lander and holds three translucent plastic rings to create the halo effect seen in the show. The finger protectors are also alrticulated at multiple points so that they may swing forward and cover the back of the hands. Though not pictured, the chest can open to reveal a reddish gem with an optional King of Hearts symbol and the shoulders open to reveal large cooling vents. I could go on, and take a lot more photos of this thing but I'd end up filling the whole page with the insanity that is God Gundam.
High Grade Powered Arms Powereder
Yup. Powered Arms Powereder. I'm not kidding, that's what it's called. It's a "Build Fighters support weapon" from the Build Custom line. No mobile suit is included in this kit, just a backpack, some arms, a number of attachments for those arms, a rifle, and two forearm-mounted gatling guns. Oh, and there's a little adapter that allows the backpack to mount on HG kits which only have a single central peg instead of just the now standard double-peg. I went into this thinking I would build it in a single afternoon. I was wrong. Very wrong. Were it not for the absolutely terrible gate placement on this kit, I likely could have had it done in such a short time. Unfortunately however, Bandai didn't seem to put much care into this kit, given that pretty much every single gate on this kit save a few were in the worst possible places. The vast majority were on prominent, flat surfaces rather than along edges where corners could be cut in hiding nub-marks. In order to not leave nasty white marks everywhere (a difficult task, as this particular shade of grey gets stress-marks if you look at it wrong) I had to meticulously file, sand and buff every one of the many gates. Even then, there were a handful of gates I could do nothing about because they were placed so poorly that even my very thin file could not reach them without damaging surrounding details. I'm not really sure what I expected from what I can only assume based on the name is an elaborate shitpost in plastic form. Regardless, once those nubs are taken care of and the thing's panel lined up it doesn't look too bad. It could certainly do with some metalic paints here and there though. The fact that the backpack, arm weapons and arms themselves all use 3mm pegs and holes means that they can readily be mixed and matched with just about any High Grade kit available in some way, shape or form so that's a plus too!

High Grade RGM-79GM [Shoulder Cannon/Missle Pod]
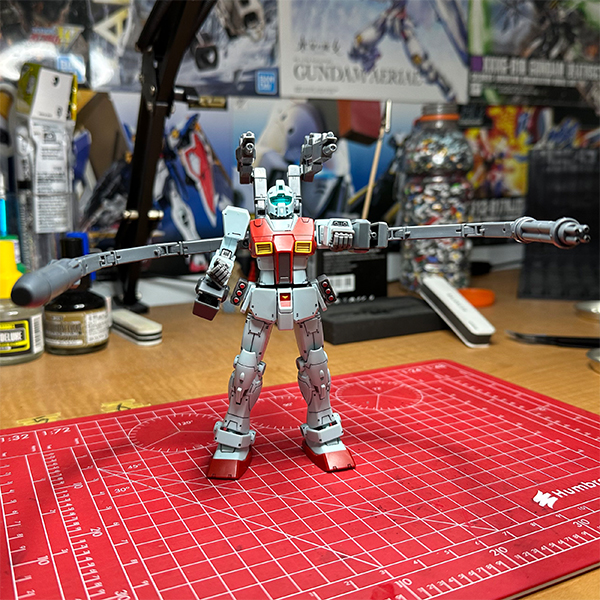
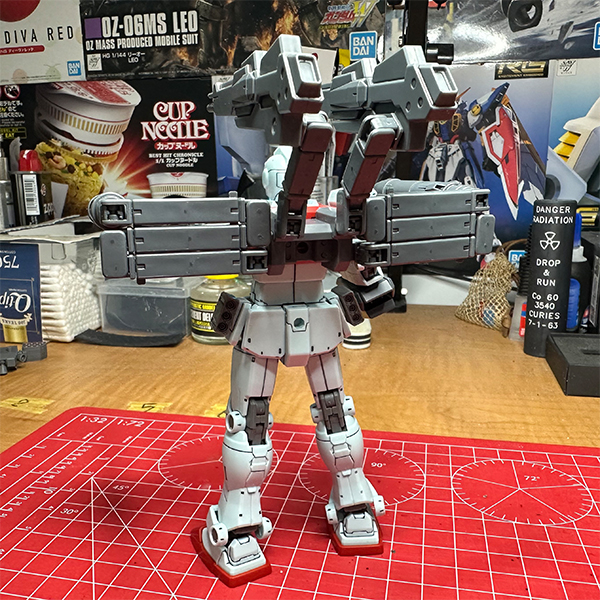
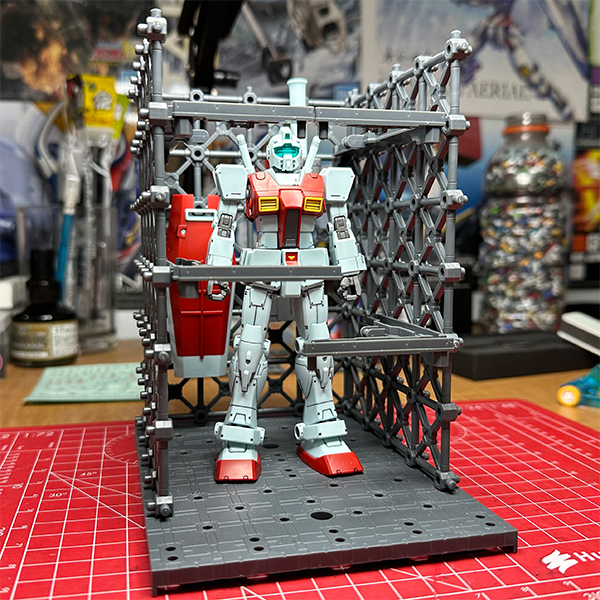
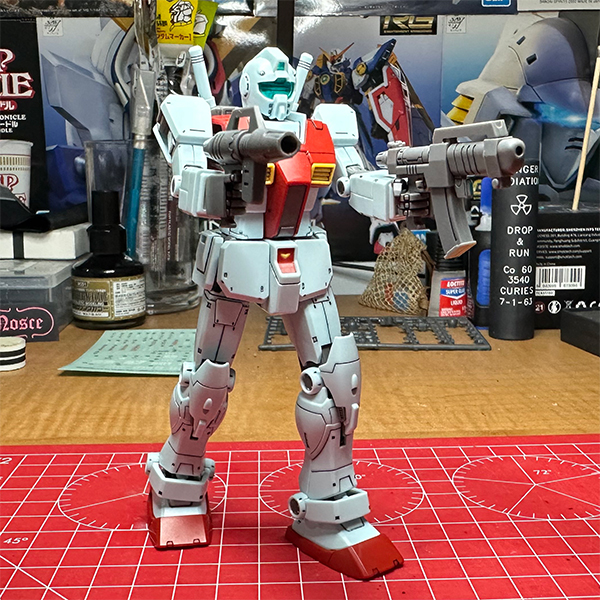
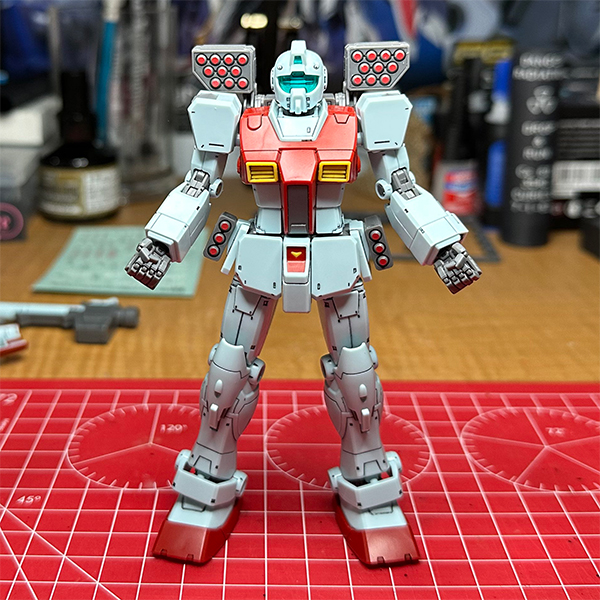
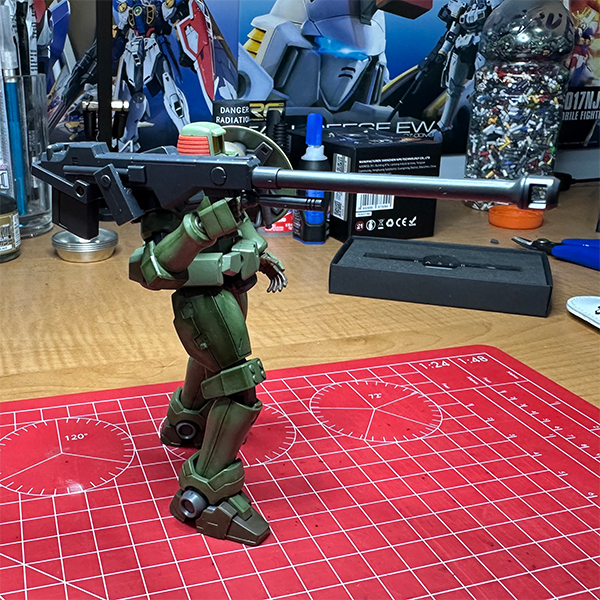
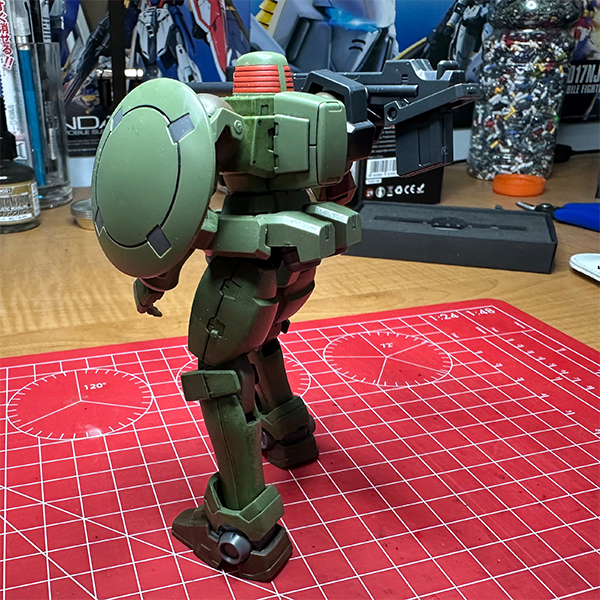
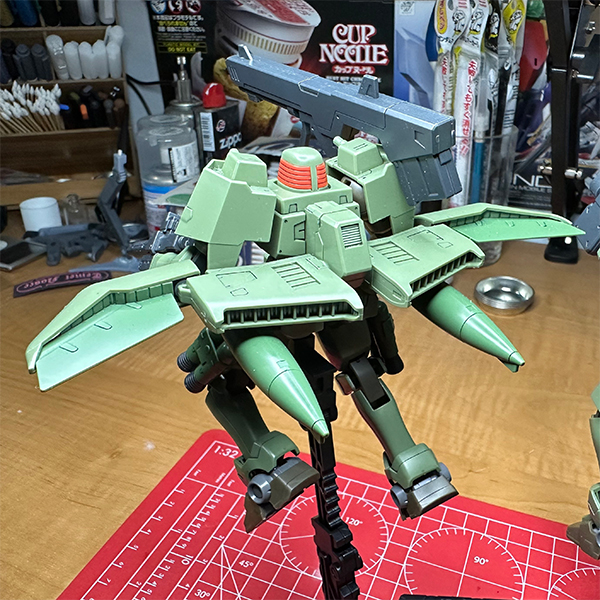
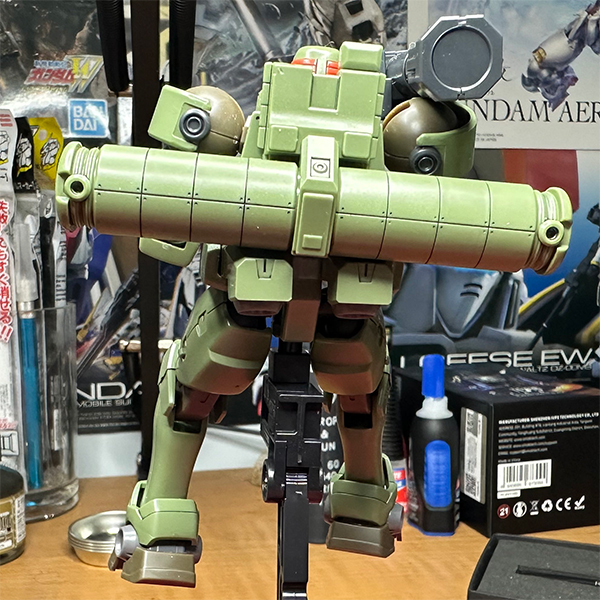
This is one cool kit! It's not without its faults, but the extra details and plethora of accessories make up for it. Building this kit gave me some good practice with the new tools I picked up recently, and I'm glad I decided on a whim to grab a bottle of Mr. Weathering Color Multi Black. Some of the panel lines on this kit are much too deep to reach with the rather wide tip on the pour-type panel liner pen (GM301) so I dipped a fine tip paintbrush in the Mr. Weathering Color, dabbed it on those deep panel lines and it worked a treat! As for the faults, there's three. Firstly, the torso's got some extra articulation, which is great... but also means that assembling the lower part of the torso is a bit fiddley. Second, the front skirt pieces are way too lose, and just kind of flap around. This isn't too much an issue as they drape well when moving the legs but I like being able to pose the skirt portions on a mobile suit exactly to my liking. Lastly, and I should have noticed this as it is depicted on the side of the box... There is no additional hand with an angled wrist joint, so the bazooka can't actually sit properly on the shoulder when held. Still though, I really like this kit a lot, so I can look past all that and the many, many color-correcting stickers. As usual, there's a bunch of extra decals I've not yet applied and I'll provide an update when I get around to that. I should note the hangar depicted below isn't included in this kit, it's something I picked up a while back and never featured. For those interested, it's the 30 Minute Missions Customize Scene Base Truss Base Ver. Oh, and I haven't forgotten, I know I said I'd do the Psycho Zaku next but I'm going to need some new paints, and it's still too rainy to paint anyway. One of these days I'll get a proper desktop paint booth.

Master Grade XXXG-01D Gundam Deathscythe
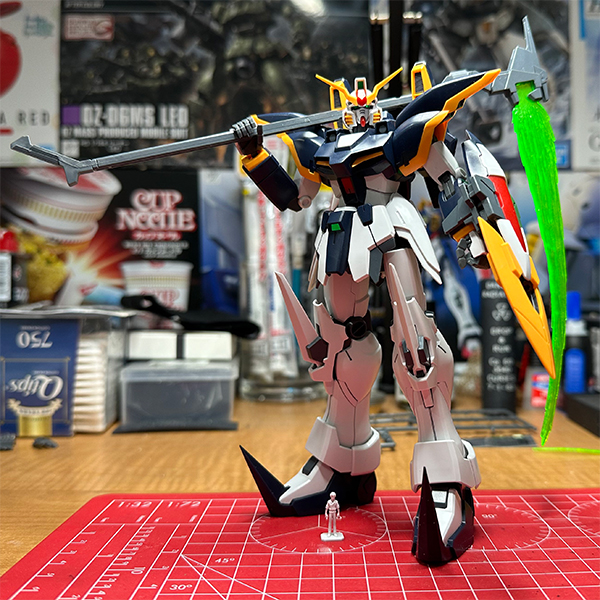
This was the winner of a poll to determine which kit I would build next from my seemingly ever-growing backlog of kits. I really like this suit's design! The big, kind of bat wing shaped pauldrons are a really nice touch and help to give this unit a unique shape. As usual I've elected not to put on the many decals right away, as I really like the clean look though I just might put them on sooner than later. Build-wise, this kit was really quick and easy despite its age and occasionally difficult to discern instructions. Being from the early 2010s line of Master Grade After Colony timeline kits, it kind of feels a little more like a scaled up High Grade than an actual Master Grade. There isn't a whole lot by way of gimmicks in this one, the only thing being a simple geared mechanism to make the yellow bits on the shield open up so that another beam blade can be attached there. There isn't any additional equipment either, as Deathscythe is perhaps the least-equipped Gundam in the After Colony timeline. Despite all this, I can't fault it. It was a fun build and it looks great! I also used some new tools here and there while building this one, so keep an eye on this page for a future review of those tools!
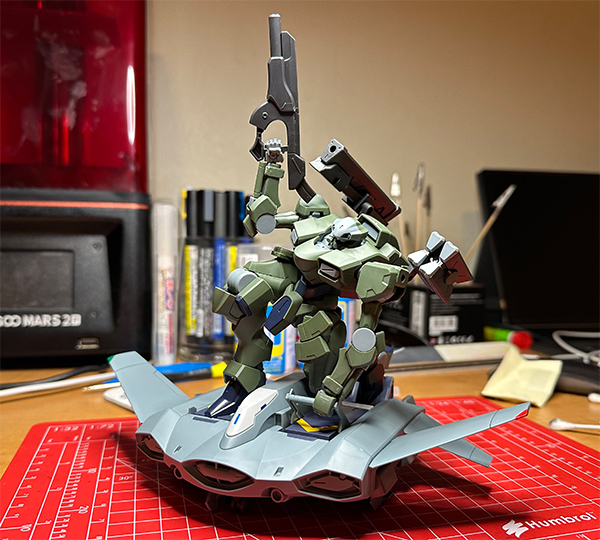
High Grade OZ-06MS Leo Full Weapon Set (P-Bandai)
I had tried a number of times to get my hands on this kit. The first time I tried to purchase it, the seller never sent it and I had get a chargeback. The second time I tried to purchase the kit... I was sent an action figure of the Leo mobile suit instead and had to return it. Third time's the charm though! It was sent from Japan at a few times the retail cost but that's to be expected when you don't pre-order a P-Bandai kit, I guess. It's no secret I am a fan of New Mobile Report Gundam Wing, and Zech's Tallgeese so of course I adore the Leo. Most folk who have only watched the series and not read any of the other After Colony material are led to believe that the Leo's combat capabilities are lacking, but this is not the case! The OZ-06MS Leo is an agile, versatile mass-production unit with direct linage to the Tallgeese itself. In its standard loadout the Leo is admittedly slower than the Tallgeese as it is not equipped with the heavy vernier boosters, but some of that loss is mitigated due to its much lighter and more cost-effective armor. The reason we see them exploding on-screen all the time is because much like the Tallgeese, it takes a highly skilled pilot to take full advantage of the Leo's awesome power. For those who still doubt, I might remind you that in the very first episode of Gundam Wing, we see a Leo ground unit disable a Gundam... IN AERIAL COMBAT.
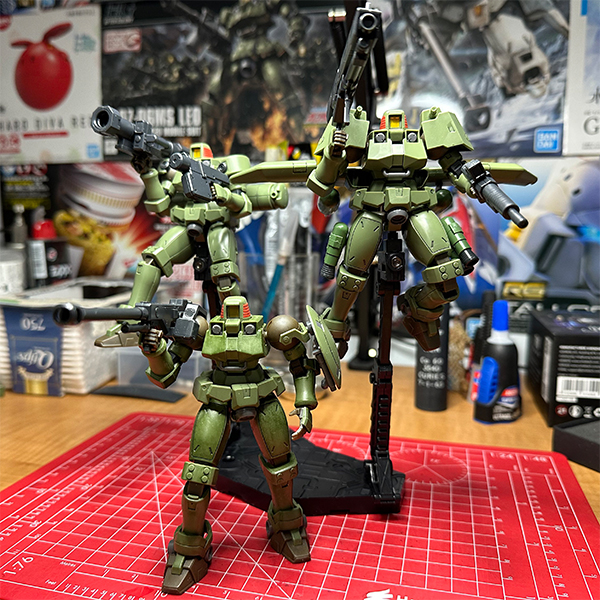
The HG Leo Full Weapon Set includes a single Leo mobile suit unit, a plethora of weapons including those found in the standard Leo kit, two alternate shoulders in addition to the standard ones, a spaceflight booster pack, an in-atmosphere flight pack and leg rockets, two pairs of open hands, and two parachute packs. More on those hands and parachute packs later. I already had two standard Leo units in anticipation of getting this kit and creating a little Leo army, so don't go grabbing this thinking you'll have three complete mobile suits from the get-go. Oh, and pay no attention to the fact that one of them is partially weathered. I swear I'll finish that some day... I still need to finish the first green layer, then do a bit of a black wash and then add some brown here and there as rust.
A little sidenote: I am using a few Action Base 2 stands put together in order to display these Leos. Don't do this. The Action Base 2 is terrible, everything about it sucks. Use the Action Base 5 instead, it's the same price and is superior in every way. I'm only using them here because I had some in my big ol' pile of stands and I wanted to do something with them so that they don't just sit around for all eternity.
Pictured above is the a Leo in the same configuration as we see in the first episode of New Mobile Report Gundam Wing, when it is piloted by Zechs Merquise in what can only be described as an absolutely insane engagement against the series namesake Wing Gundam. It carries a shield with two beam saber hilts stored on it, and a Dober Gun reminiscent of that which we would later see equipped on the Tallgeese. On its back sits a single-use parachute pack, which I might add is not color accurate as in that episode it is a bit more of a blue-green.
Here we've got the flight pack, rocket boosters, and command-type shoulder cannons. I realize now as I write this that I forgot to paint the cannon barrels black. Oops. Don't worry, I'll take care of that when it stops raining so I can go outside and airbrush them.
And here we've got the space-type manuvering pack and retro-thruster shoulders. Multi-role capability by just swapping a few parts, neat huh?
Lastly we've got the bits I didn't use. The beam sabers, standard shoulders, two of the guns (one of which comes with a shortened barrel, not pictured) a parachute pack, and some hands. Now you may have noticed that parachute is also not color accurate as previously mentioned but even moreso in that it is brown and that one of the hands is green. Why is this? Well... Bandai decided to put the open hands and the parachute pack on the same runner for some reason?? As a result, we get one in green and one in brown so that we can have a set of brown hands and a green parachute pack which then leaves us with green hands and a brown parachute as well. Weird. Not complaining, though. With a bit of paint this means we've got some perfectly usable exra parts!
Real Grade OZ-013MS Gundam Epyon
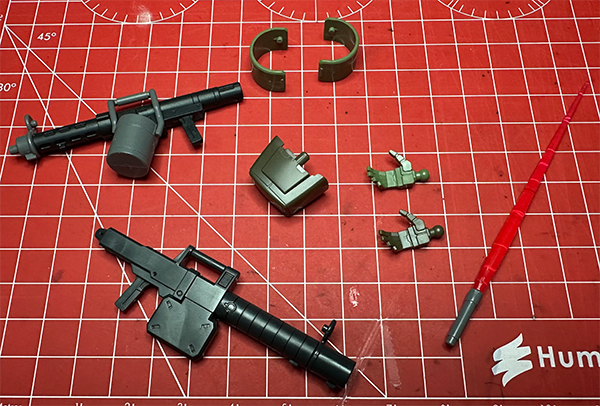
Unlike the 30MM tiltrotor kit I covered a while back, this kit is a testament to Bandai's dedication to detail. The interior frame is covered in countless details that look like the internal workings of a giant machine... even though all those details get covered up by armor later on in the build. This does leave the door open though, for some fantastic customization by way of battle damage where pieces of the armor is chipped away or broken to reveal those inner workings. The decal sheet for this thing is absolutely nuts... I haven't applied any of them yet, as I want to live with the kit in a more show-accurate state for a while before applying them but I'll be sure to post an update when I do.
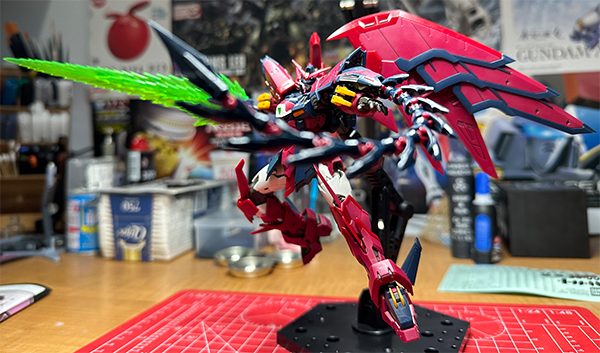
This kit is kind of difficult to photograph, especially with the pose I have it in as there is a lot of dimensionality to it. Usually I can squeeze in real tight on a mobile suit and get the whole thing in frame while keeping a decent amount of detail when I crunch down the image for this site, but not in this case. As such, here's a rare close-up shot.
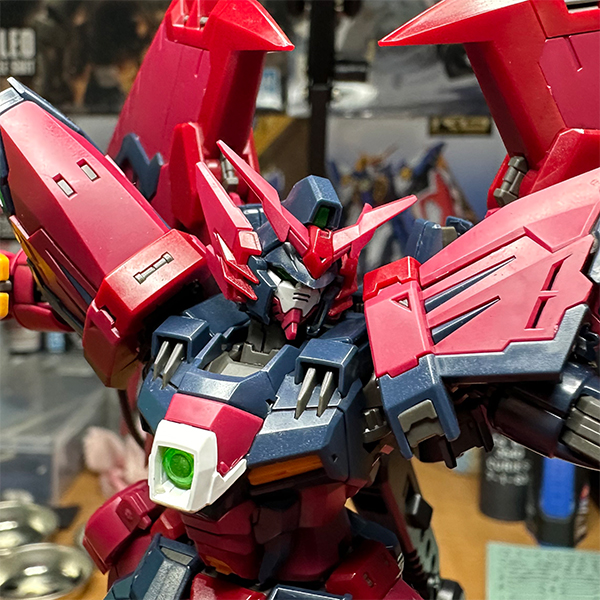
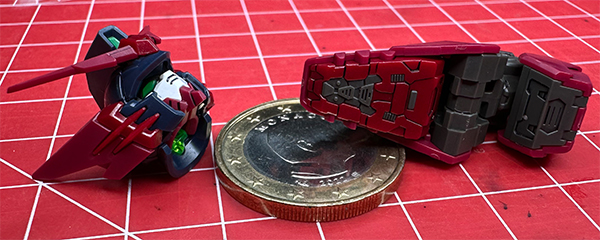
Something else I love seeing is Bandai's attempts at being more modification-friendly. With this kit they've made a sort of light-pipe in the bottom of the head so that if you replace the ball on the neck joint with an LED the eyes and head cameras will light up. And their attention to detail continues even on the underside of the foot. These details are absolutely miniscule, and a bit of panel lining helps make them pop... though no one is likely to see them. One Euro coin included for size reference.
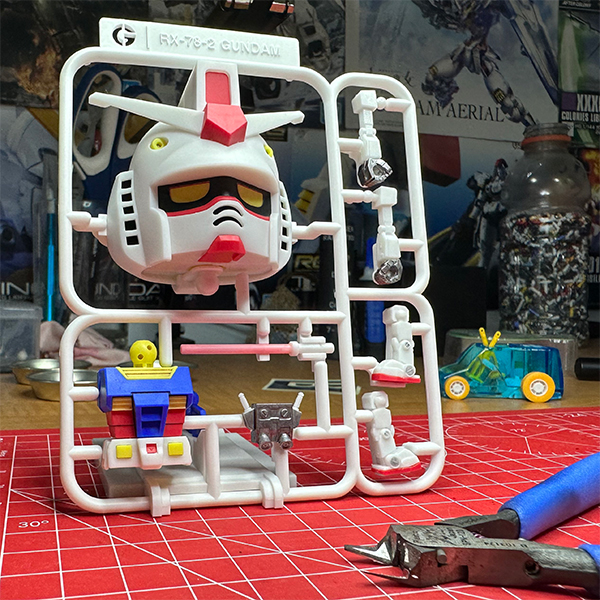
No-Grade Gunpla-Kun DX (With Runner Ver. Recreation Parts)
This is such a weird kit! At first glance Gunpla-kun could be mistaken for a regular ol' SD Gundam, but he very much is not. Gunpla-kun is from a series of advertisement videos wherein he and his friends share the joy of Gunpla with humans... sometimes by way of shouting at them in a hobby store. Gunpla-kun and friends can assume two forms, either built or un-built as pictured here. Generally they assume the unbuilt form when talking about runners, or when resting/sleeping... or hiding from a child's parents? Even though they talk to adults in the aforementioned hobby shop?? None of it really makes any sense. This kit itself doesn't make a whole lot of sense either. It's a relatively quick build if you just snap-build it, but without some paint it is perhaps one of the least color-accurate kits Bandai has ever produced. Painting it is no easy task either, because it is made of a revolutionary new eco-friendly material that happens to be very fragile and it has small parts that threaten to snap off if you so much as look at them wrong. As a result I was afraid to even try masking those parts off for airbrushing so I elected to hit larger areas with a Gundam Marker and smaller or harder to reach areas with a very fine tip paint brush.
I used black GM10 for the inside of the mouth and the vents on either side of the head, gunmetal XGM05 for the jetpack and hands, and the Real Touch pink1 GM410 for the beam saber. I did not fully panel line this kit, but I used pour-type brown GM303 for the yellow areas and black GM301 elsewhere. There was a lot I wanted to do with this kit but once I came to find how fragile the LIMEX limestone-based plastic is, I was afraid to even handle it too much. Seriously, every time I pushed parts together for a tight fit I heard unsettling cracking noises. Fragility aside, this plastic has some other issues. It's hard to see in photos because my phone saturates the heck out of everything but the coloration of the parts is very washed out in person, and there are numerous white blemishes which are apparently a result of the limestone. Almost every part has this white discoloration and Bandai even acknowledges this in a small statement on the packaging. I will say though, that despite being between fifty and eighty percent limestone and feeling strangely heavy for plastic, it cuts like butter. So that's nice, I guess.
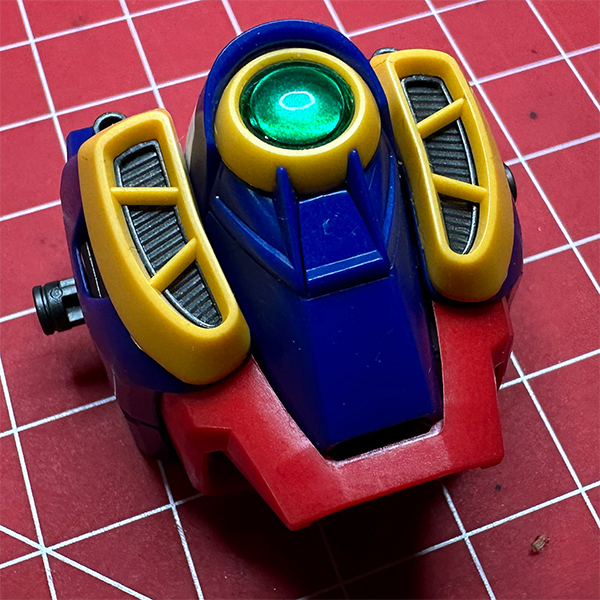
Master Grade Wing Gundam (TV Version)
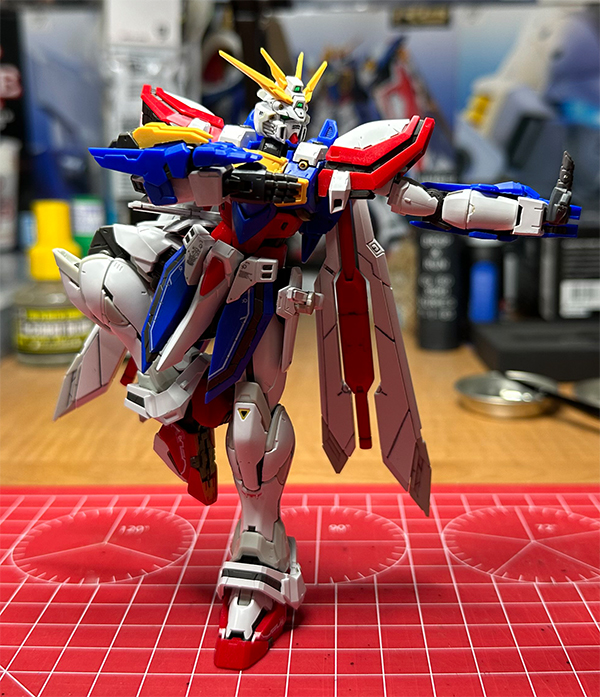
Well that break didn't last. I just can't stay away from this hobby. Not long after posting my most-used tools overview, I got to work on this MG Wing Gundam kit from 2010. Being that it's an older MG kit from the wing series, it's not the most detailed of Master Grades, and it suffers from a few small issues. These issues could readily be sorted, especially if I had a nice set of scribing tools as it's mainly just a matter of poor panel lines, which are in places less defined and deep than they should be which makes them difficult to fill in with color. Were I to scribe them, it'd be a trifle to sort out. Apart from that, this kit doesn't have much in the way of gimmicks apart from the classic bird-mode transformation ...but that's fine! It's the iconic Wing Gundam, which is a favorite of mine. I've got much of it assembeled, and some quick panel lining done on it but there's still plenty of work to be done. It's got a lot of decals and dry transfers that need to go on once it's fully built and after that it'll definitely need a topcoat to protect those transfers.
Rather than use the shiny green sticker under the little chest gem, I've elected to give the part where the sticker would go a quick layer of Gundam Marker EX Chrome (XGM100) and I have given the inside of the clear plastic dome a thin, translucent layer of the Gundam Marker EX Metallic Green (XGM06) as this combination makes for a neat effect. The green being translucent, with just a bit of metallic flake and the chrome being super reflective beneath it... it almost looks like there's a light inside! It's a very difficult effect to photograph, but it looks great in person and might show up better in video. Maybe I should start making little gifs of these kinds of things on a turntable or something.
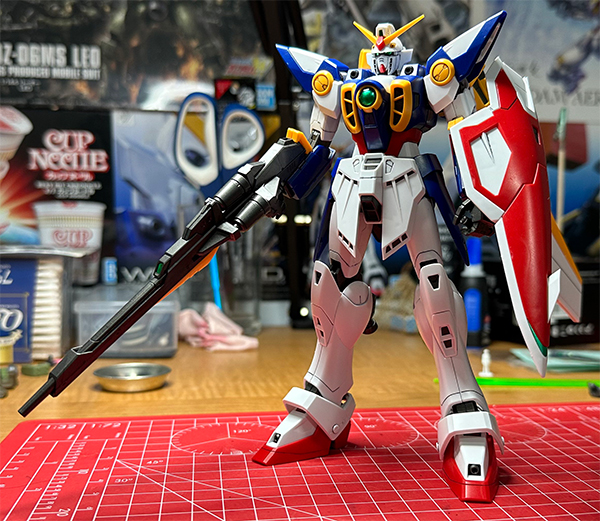
With the initial build, a quick pass of panel lining complete and a touch of chrome on the inside of the wing-thrusters, I've got Wing in a sate which I am happy to live with for a while. I'll be displaying it alongside my Master Grade Tallgeese and eventually revisit it to refine the panel lining further, add decals and dry transers, then give it a topcoat.
Quick Toolkit Overview
Since I don't really feel like building anything, I thought I might instead give a quick run through of some of the tools I use most frequently when building model kits. This is by no means an exhaustive list of the tools in my arsenal, and in no way are they required in order to get into the hobby. ...Well, except for the nippers. Little difficult to build gunpla without a set.
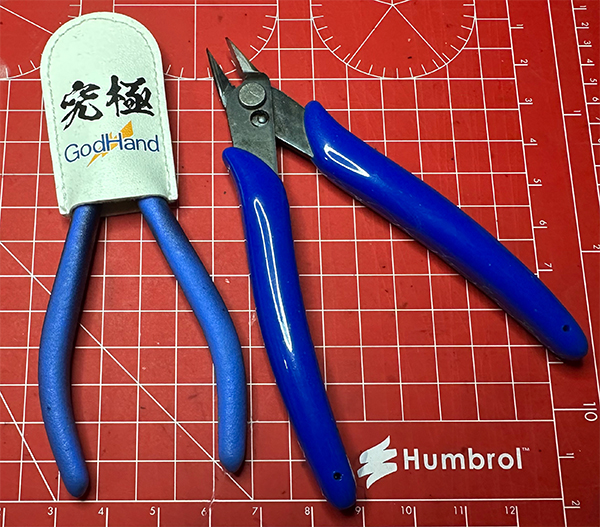
Nippers! I use two different sets. One set is a cheap, basic pair of plastic cutters. These are great when you're just getting into the hobby or need to cut materials that may damage a more delicate set of flat edge nippers like the GodHand SPN-120. The other set is the aforementioned GodHand SPN-120. These are brilliantly sharp, but differ from the standard nippers in a few ways.
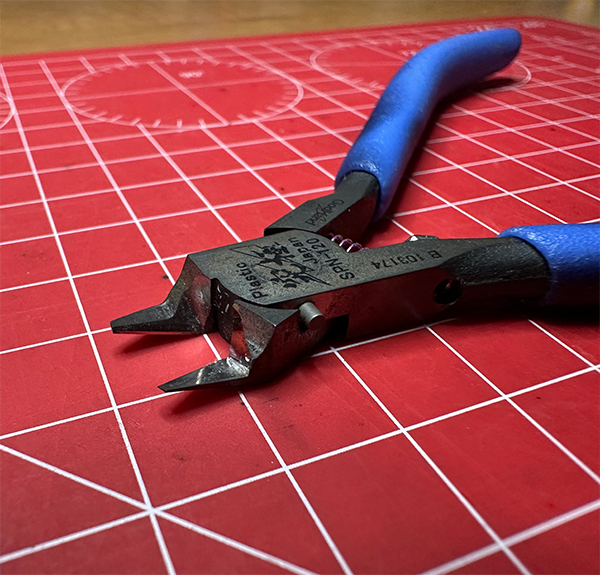
The GodHand SPN-120 has one sharp blade, and one flat edge rather than two sharpened edges as a normal pair of nippers has. This unique configuration allows for much cleaner cuts than the standard nippers offer, but harder plastics, like transparent ones may damage the thin blade.

Illuminated swing-arm desk magnifier. I love this thing. When I don't need magnification I raise it up and use it as a lamp. I find the magnification useful at various times such as painting small parts, applying small decals/color correcting stickers, and when cleaning up my panel lines.
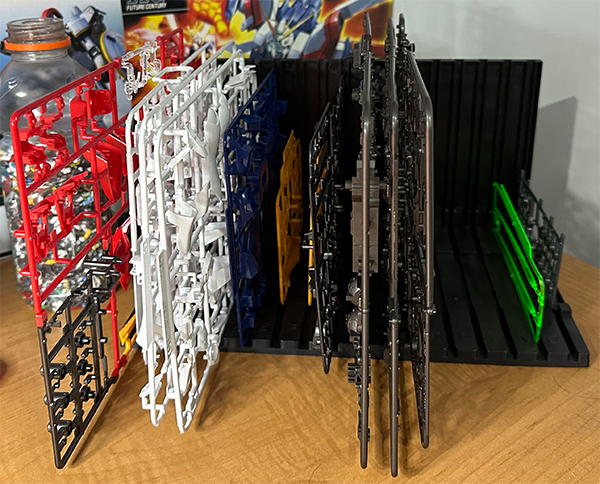
Runner/sprue stand. This little thing has saved me a lot of time. It's basically just two sheets of plastic with a series of grooves into which runners can be seated. This keeps the runners neatly organized and stops me from having to just leave them in a pile. Because I organize the runners in this stand alphabetically, I can grab whichever runner I require almost without looking. Before I had this, I swear I spent half of my build-time just looking for the right runner.
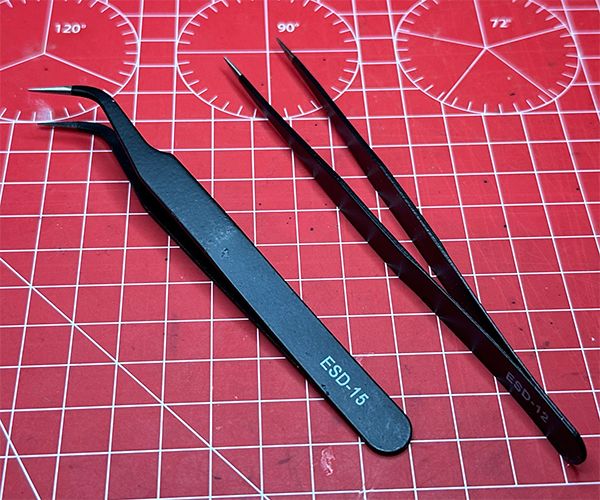
Tweezers. These make applying decals, especially eye stickers so much easier. I really wish I had realized this was a thing a lot sooner than I did. I usually use the curved tweezers, as it allows for a more comfortable hand position and less wrist-strain.

Mr. Hobby Gloss and Matte finishing spray. I don't always topcoat my kits but when I do, I reach for one of these. Nine times out of ten I'll use the matte finish, but for various things like sealing paint I've put on transparent parts or metallic paints I'll use gloss. A few quick sprays of either on a surface makes a big difference.
Mini Cleaner by Midori. Not only is this miniature streetsweeper really cute, it also happens to be perfect for picking runner clippings up from the table. When pushed along a surface its little brushes sweep debris into a small tray which can then be emptied out into the trash or recycling. It's meant for cleaning up eraser rubbings but it turns out it's great for gunpla too! Technically it's inferior to Midori's newer version 2 mini cleaner, but the new one doesn't look like a little car. If you're interested in one of these, I urge you to make sure you're getting one from Midori rather than an unbranded knockoff. I made the mistake of picking up one of the many knockoffs before getting my hands on the real deal and let me tell you... those knockoffs suck. The molding on them is awful and they'll fall apart in no time at all. The real one's great though!
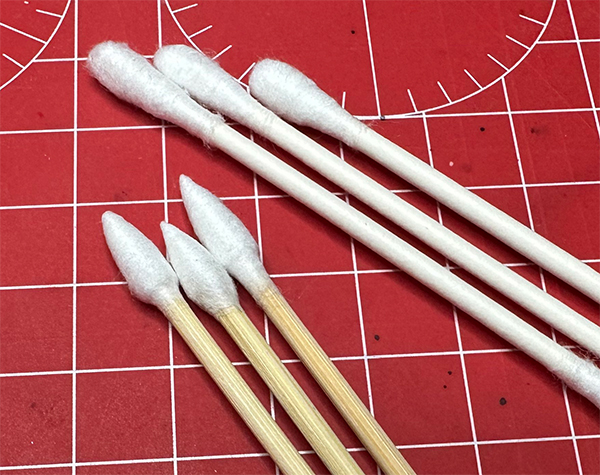
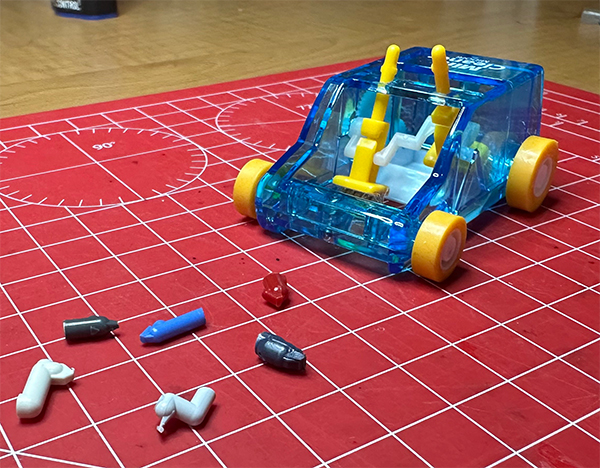
Cotton swabs! I use these mostly for panel lining, occasionally for various paint application purposes and since trying my hand at weathering with Real Touch markers I use them for that as well. I primarily use two types, one is the usual q-tip style cotton swab, the other is a much more solid and pointed swab. These were marketed as firearm cleaning swabs but I am sure they can be found under other names as well. The rounded swabs are great for cleaning up large areas of panel lines whereas the pointed swabs are good for really small details. I also use them to press down decals and make sure they're securely adhered to the surface.
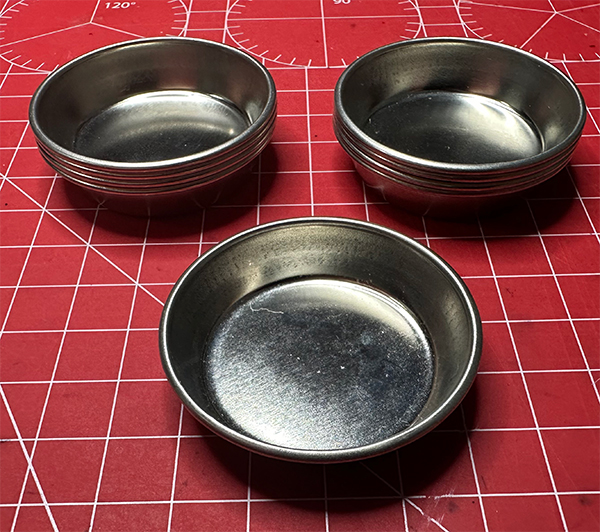
"Mr. Paint Tray" from Mr. Hobby. As with all Mr. Hobby products, this one's got a weird name but really it's just a set of ten small metal paint trays. Rather than paint, I usually use them to hold a bit of isopropyl alcohol into which I dip my cotton swabs while working on panel lining. I do use them for paint as well, when prepping my pens for the airbrush (read on to learn more about that) or when mixing colors.
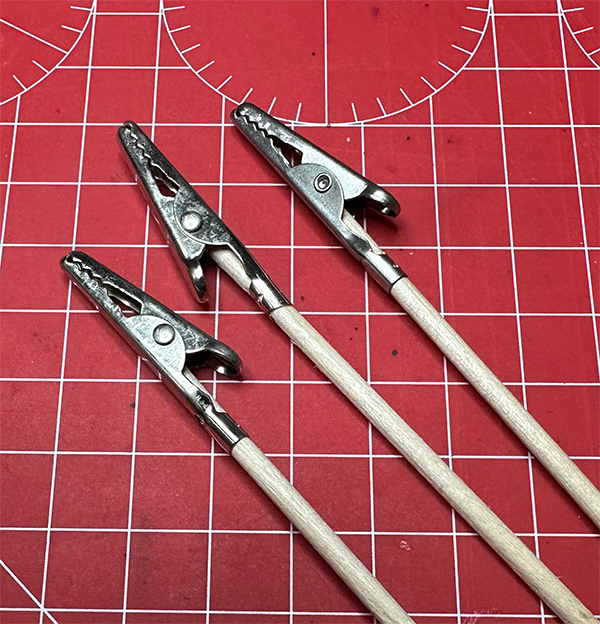
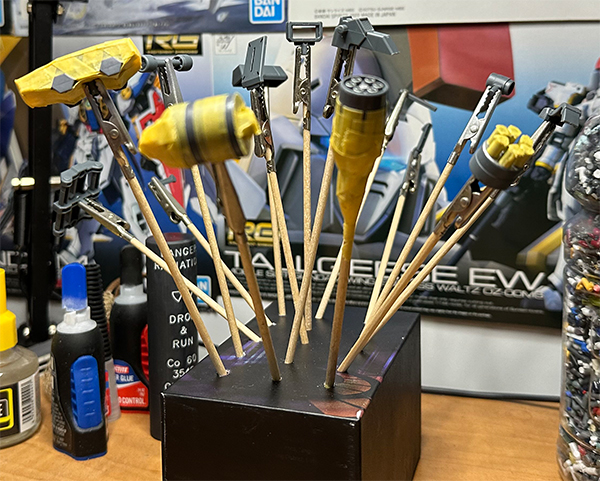
Alligator-clip paint sticks. I use these any time I paint anything. Whether I am painting a tiny detail on a part, or airbrushing an entire part I do so while holding the part with one of these. Once I'm finished painting, I'll pop the stick into a cardboard box so that it remains upright and away from my clumsy hands while the paint dries.
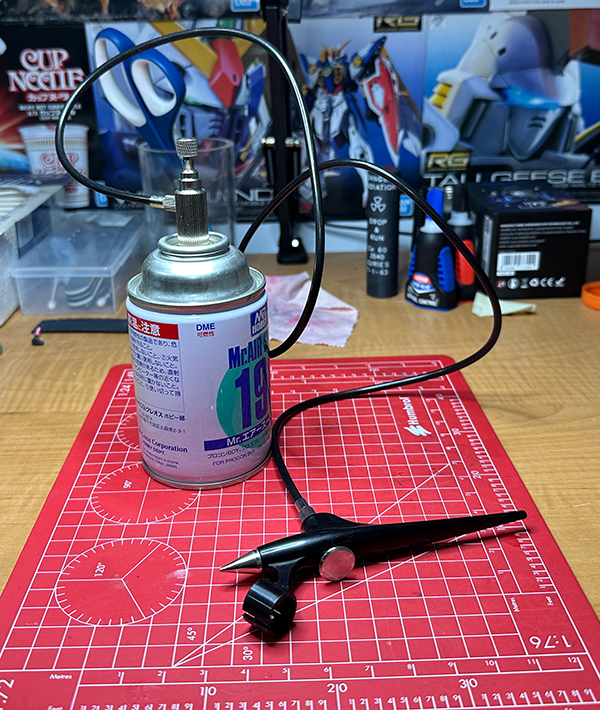
Gundam Marker Airbrush System. One might think this is just some silly gimmick... but no. This thing is fantastic. Slip a Gundam Marker into the little plastic ring, position the nib in front of the nozzle, hook it up to the air can and tada! You have a surprisingly effective airbrush. Is it the world's best airbrush? No, of course not. It's not bad either, though! It's very easy to use, requires less cleanup than a normal airbrush and it works with the amazing Gundam Marker EX Chrome that I love so much. Better yet, using it with the small air can makes it very portable. There's even an alternate set of nibs (not pictured) which you can replace the standard Gundam Marker nibs with in order to get an even better spray pattern.
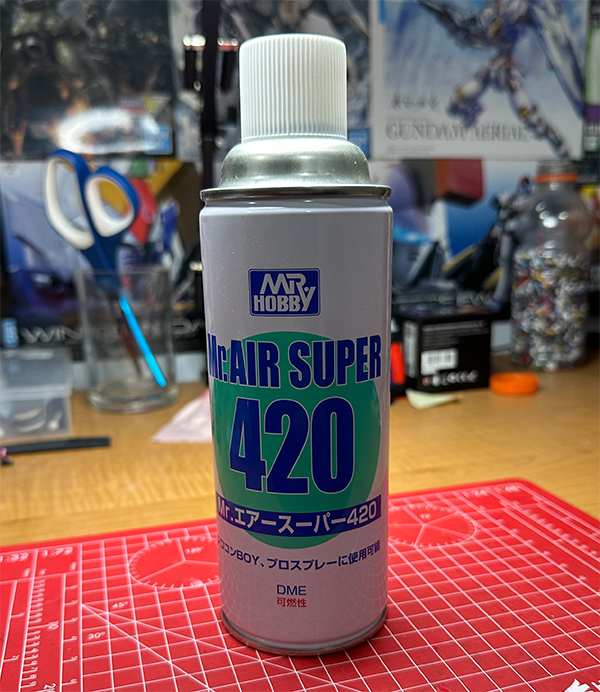
Mr. Air Super 420. Haha, funny number. In all seriousness though, this is just a larger can of air for use with the Gundam Marker Airbrush System. It can also be used with another airbrush in the Mr. Hobby product line, but I have not had the chance to try that one out yet. Maybe some day!
30MM Extended Armament Vehicle [Tilt Rotor Ver.]
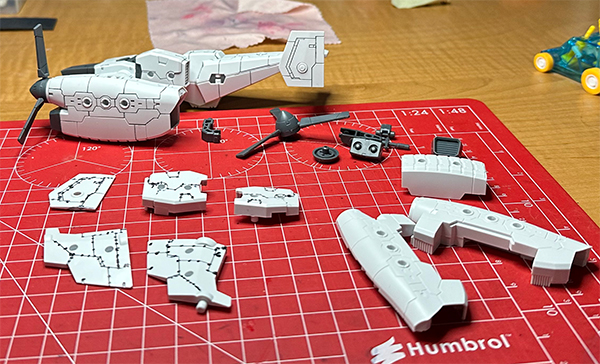
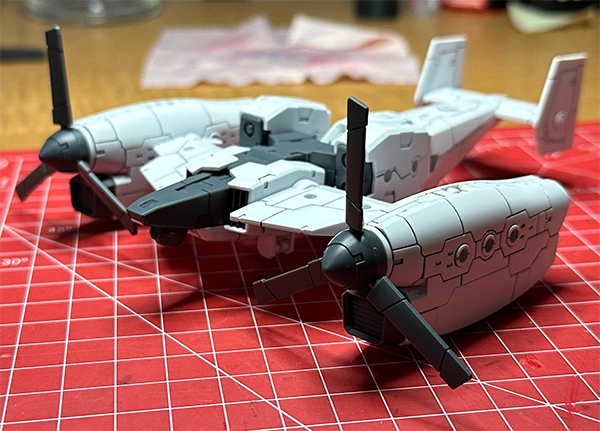
I thought I'd grab this particular 30 Minute Missions kit because it'd make a neat backpack for HG Gunpla. I wish I hadn't. This kit is dreadful. It's from Bandai's line of "30 minute missions" kits, which is supposed to be a series of simple, quick to build kits. These kits are designed with numerous 3 millimeter such that pretty much any accessory using the same hole and peg system (pretty much all High Grade gunpla and numerous other IPs which bandai has model rights for) can be used to customize them. While this is an excellent idea... the execution is rather poor. Being that these kits are meant to be build very quickly, they have no decals or color correcting stickers whatsoever. Normally... I hate color correcting stickers. When I open a kit's box to find it jam-packed with a buttload of decals, I let out an audible groan. I thought this would be a perfect kit to just mindlessly assemble whilst I unwind. I was wrong, very wrong. This kit is an atrocity. It is an affront to all that Bandai has strived for in their many years of model kit design. Nothing good can come from this kit. It has broken me.
I know. Strong words, but let me explain. This kit commits a number of model design cardinal sins. Firstly, the vast majority of the kit is in a single shade of white. White is the worst possible color to make a kit out of. All detail becomes lost in a sea of white plastic. From more than a few feet the whole thing appears to be nothing more than an amorphous blob of whiteness. They have tried to solve this by adding more panel lines than you can shake a stick at. This however is another mistake. These large parts of unbroken whiteness have exceedingly long panel lines, and the longer a panel line the more difficult it is to get them looking even close to good. With this number of long, unbroken panel lines it is effectively impossible to get them all looking uniform. I would have to spend hours upon hours meticulously going over each and every panel line. Don't get me wrong, I enjoy panel lining... but not to this extent. But wait, it gets worse! Because this kit is meant to be quick and easy, it lacks "gimmicks" or features the likes of which Bandai's model kits are known for. The gimmicks in Bandai kits are always a joy to build. It's always so interesting to see how they've made them work, which often lead to moments of pure wonder during the build process. This kit has none of that. This is the first kit I've ever built that feels like a chore rather than an enjoyable way to unwind and enter something of a zen state. Shame on you, Bandai. Shame on you.
[UPDATE] It is done. I still hate it, but it is finished. And I mean finished. Normally when I am "done" with a kit, it simply means it is in a state which I am happy to live with and display for a while before revisiting and making improvements. In this case however... I am properly finished. I will not be making any improvements to this kit whatsoever. My original plan with this was to attach it to the back of a gunpla and then add some arms and weapons from an add-on pack I had purchased alongside this. I may still do that eventually, but it likely won't be any time soon. In fact... I think I might just take a break from building model kits altogether. I don't like being this upset by something which is meant to be a pleasant distraction.
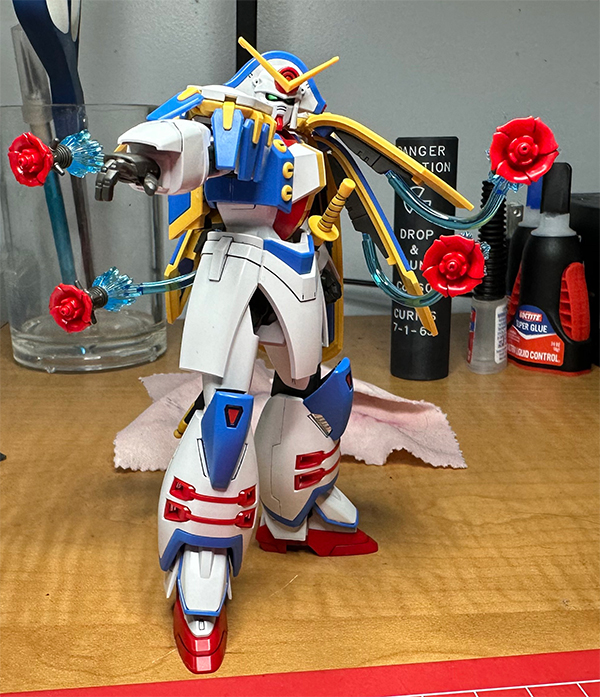
HG GF13-009NF Rose Gundam (P-Bandai)
This is a very interesting kit! It's my first time building from the "Premium Bandai" line. Premium Bandai kits differ in a few ways. They often come with extra details, gimmicks, or accessories that the standard line lacks. Some Premium Bandai kits are recolors of standard kits with a few extra bits while others are reworks of older kits. They can often be told apart from a regular kit by their (usually) distinctive box. Rather than having full color graphics on the box, they'll be monotone... unless they're a more recent US-region P-Bandai? In which case... sometimes the box is in color?. On this kit I have kept panel lining minimal, and have put a little dab of chrome on what look like heatsinks inside the bottom of the knees and in the red vents on the shins. I think it really helps make those little details pop! I don't have the older non P-Bandai Rose Gundam to compare with, but I'm rather impressed by this kit given it is still technically just a high grade.
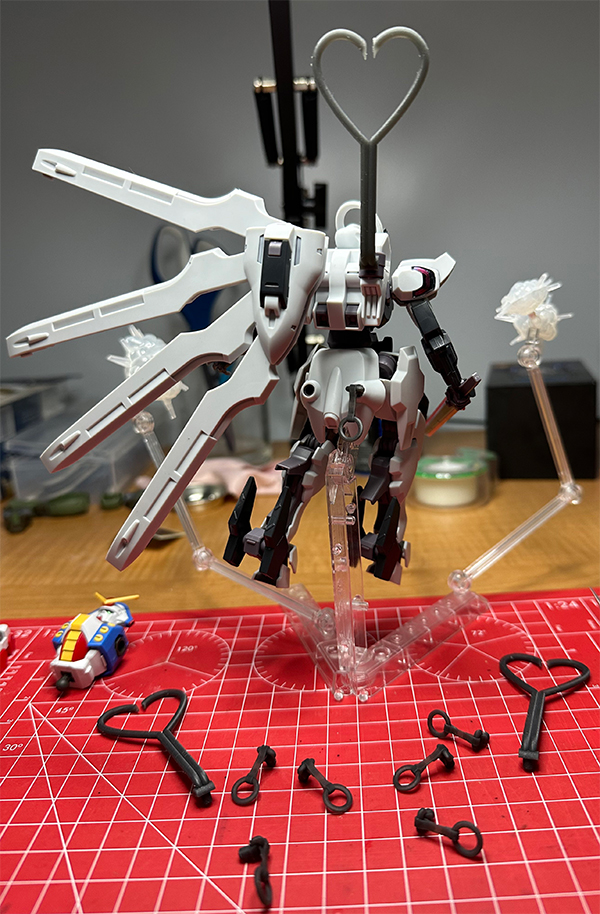
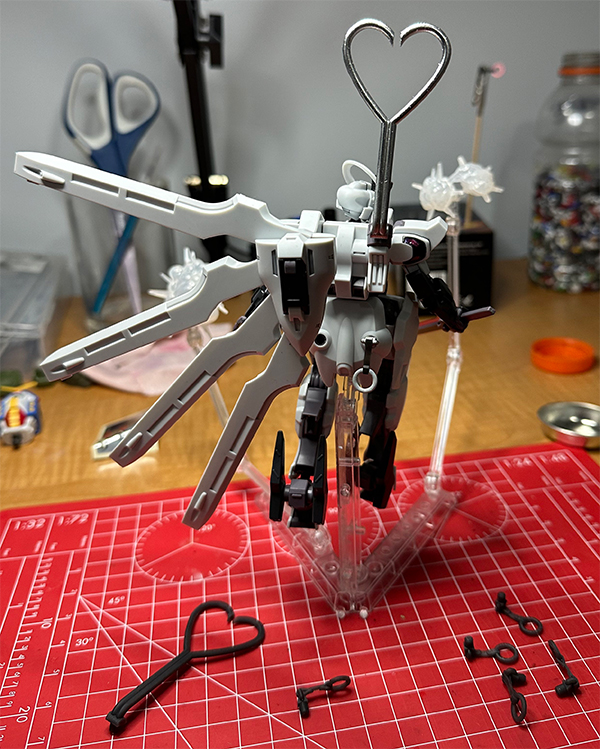
Bonus Bosozoku-inspired modifications!
with the help of a friend, I've made 3mm peg-based accessories for gunpla, 30 Minute Missions and a host of other model kits which utilize the same peg and hole system! These modifications are inspired by the Bosozoku car modification scene in Japan and include dual heart-shaped exhausts and a subway/train handle or "tsurikawa."
I will have to find a better way in which to orient the exhaust pipe when printing, so that it doesn't get so heavily marred by the print support structure
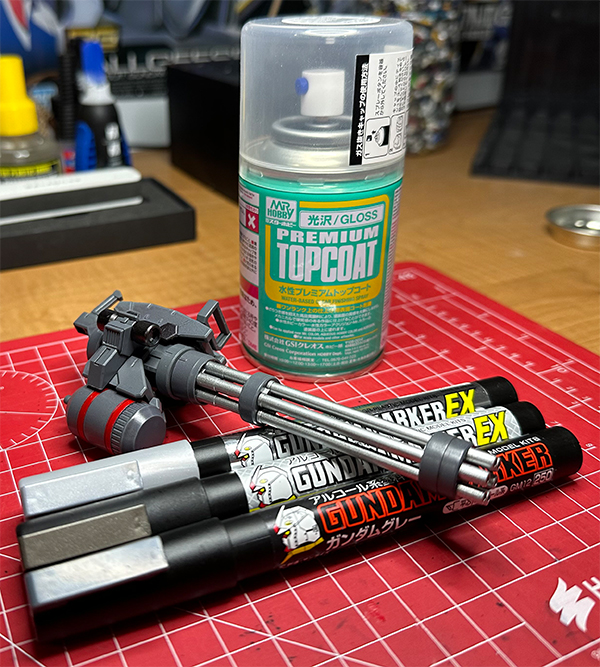
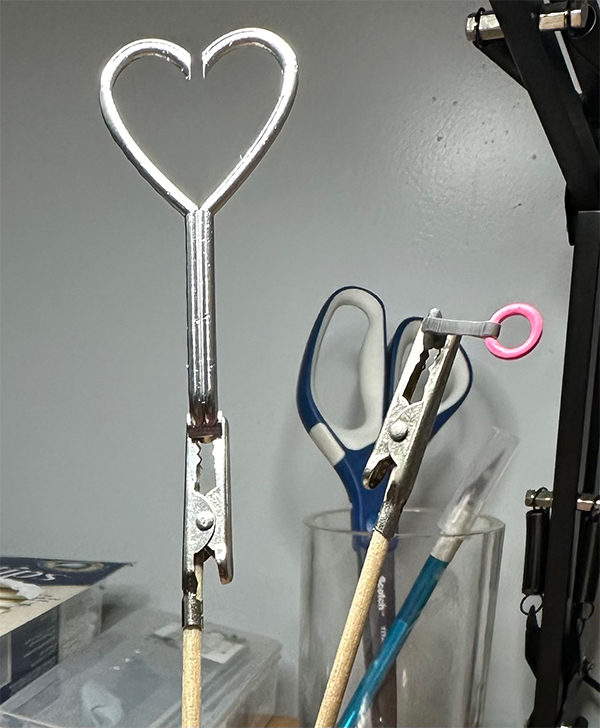
Update!!
I gave the exhaust pipe a quick spray with the Gundam Marker Airbrush System, using Gundam Marker EX silver chrome (XGM100) and it looks amazing despite my poor decisions when setting up the print's supports and the marring that resulted. I've also thrown a quick and dirty layer of paint on a couple of the tsurikawas using just the Gundam Markers on their own (Gundam Markers pink and white, GM14 and GM11 respectively) just to get an idea of what colors might go well with what kits.
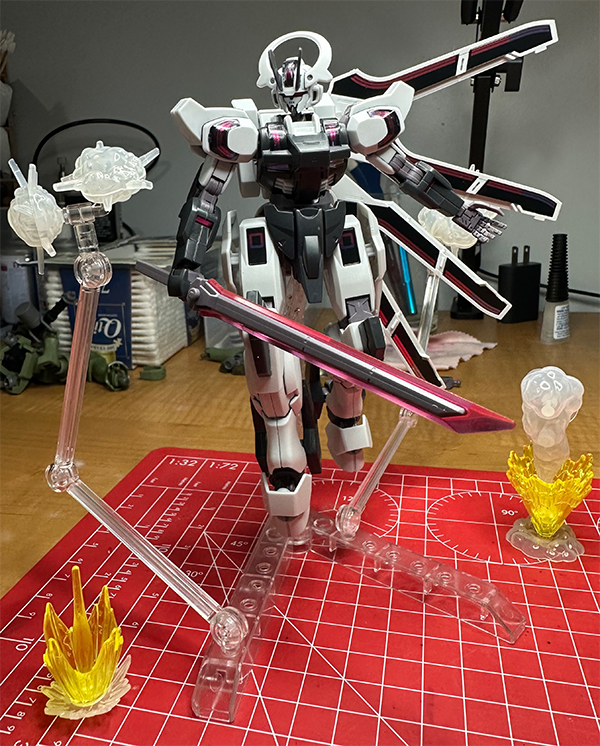
HG MDX-0003 Gundam Schwarzette and effects parts!
Schwarzette is a pretty quick build, and relatively simple. It's a fun one though! It's got some interesting hoof-like stompers on it, and the bit staves that can become wing-like components or act as a giant popsicle looking sheath for the sword make for a lot of potential when it comes to creative posing! The smoke clouds and explosion/impact effects are from some effects packs intended for 30 Minute Missions kits and help to add a lil' something to a scene. I want to try painting them up a bit.
Super awesome multipurpose adpaters!
These were designed with the intent of converting the HGAC Wing Gundam model into Wing Gundam Fenice, but as an added bonus they allow for some other configurations like quad-wing! These should also work just fine with anything else that uses 3mm pegs and holes. This means a vast majority of High Grade gunpla kits, 30 Minute Missions kits, and 30 Minute Sisters kits as well!
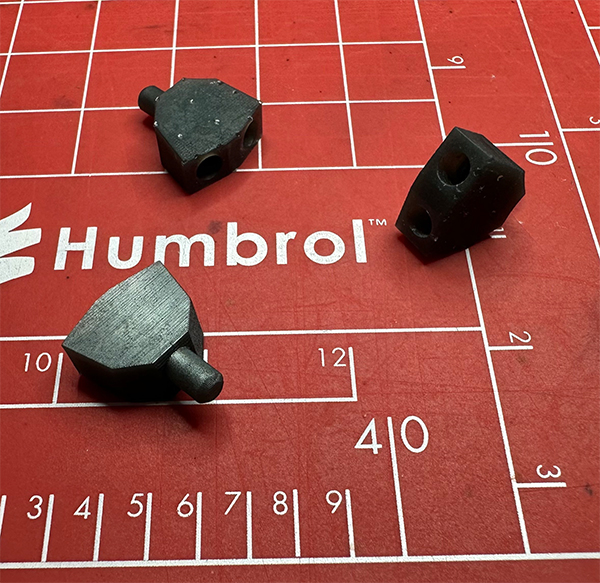
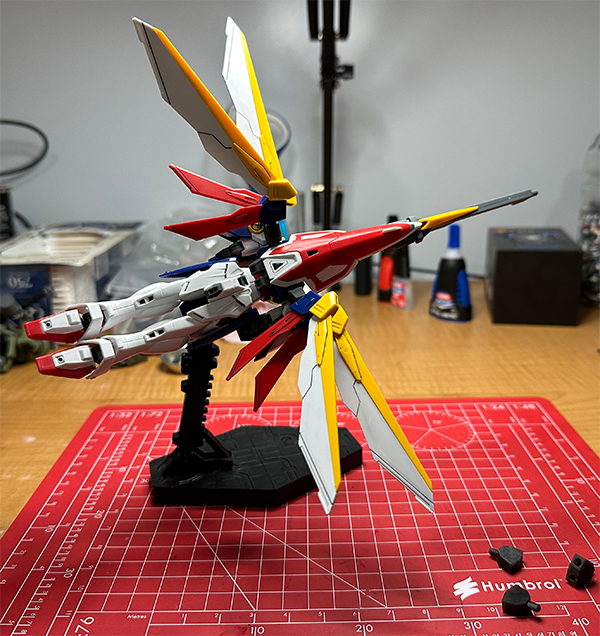
Did someone say custom backpacks?
No? Oh. Okay, well a friend and I are making custom 3d printed backpacks for 1/144 High Grade kits! They should totally work on 30 Minute Missions kits too! It took four iterations to get the peg size right, with three of those iterations being printed simultaneously. Yay for being able to print three things in the same amount of time that it takes to print one thing! You may notice the test article looks a bit nasty. This is because I was concerned only with fitment, not finish
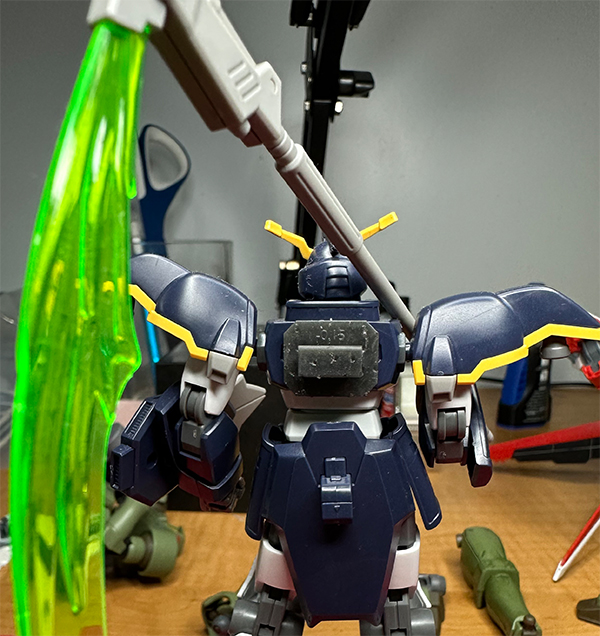
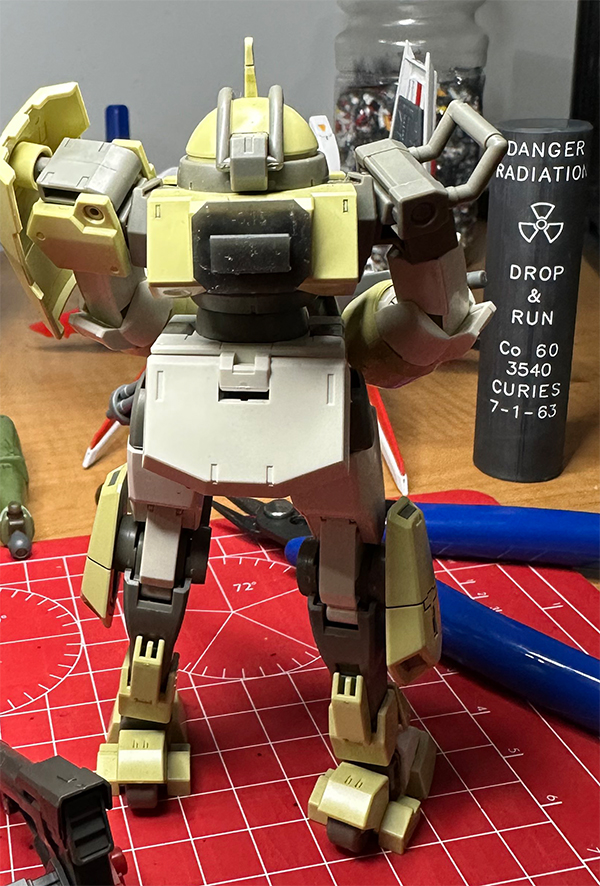
Adventures in Weathering
This is my first time using Real Touch markers for weathering, and I've decided to use my OZ-06MS Leo as the testbed. For the first of three (or four, haven't decided yet) passes I used GM408 Green1 to give the normally uniform green of the mobile suit a more worn looking paintjob. For the brown parts such as inside the knee, the shoulders, and foot armor I am using GM407 Brown1. With grey parts (though I've yet to do those) I will either be using GM401 or GM402, Gray1 and Gray2 respectively. After these initial passes, I'll be using GM406 Gray3 (which is really more black than gray) for some extra grime and lastly I'll follow it with a few little dabs of the Brown1 to add rust spots.
Pictured below is a comparison between a leg that has only matte topcoat, and a leg with a quick pass of the aforementioned green. The lighting and crunched resolution makes this first pass look a bit more intense than it is in person. In fact, I often find that kits end up looking very different when photographed in general.
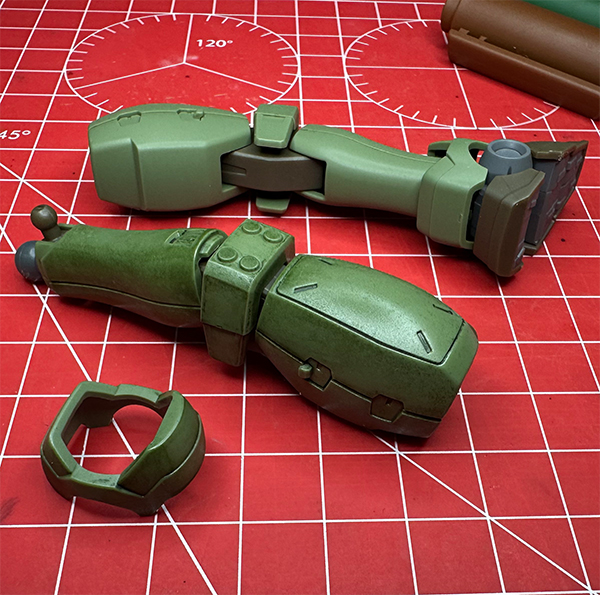
RG OZ-00MS Tallgeese (EW)
The Real Grade Tallgeese Endless Waltz version is one of my favorite gunpla kits. Being that Tallgeese I is my favorite MS (Please don't tell Wing I said that) I am very glad Bandai did it justice when designing the Real Grade kit. It was a lot of fun to build, it has some real fancy gimmicks for the way the verniers open up and it has far more articulation than I would have expected. I just wish I could have grabbed the TV anime colored version when it was available, but fortunately this EW version can readily be repainted... Which I just may have to do some day.
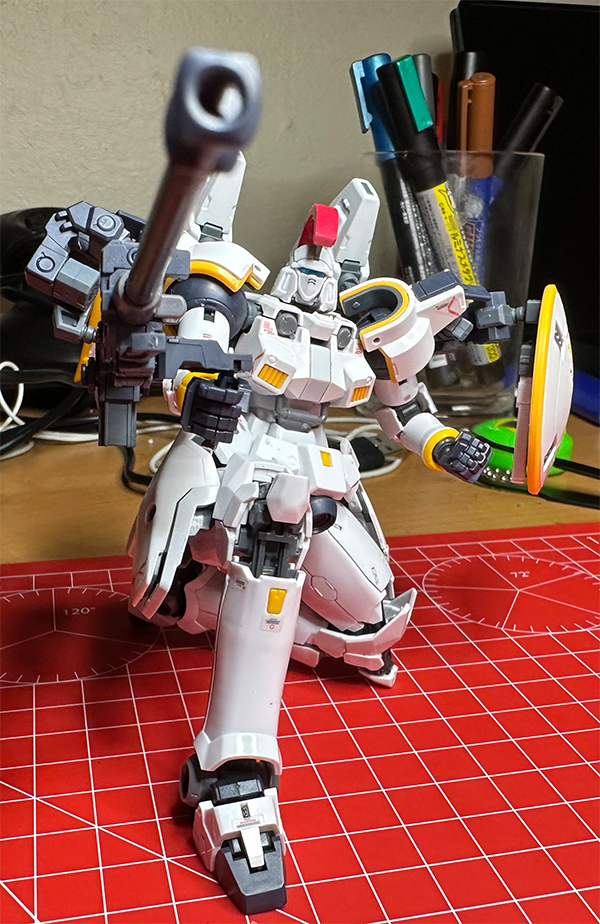
Haro Diva Red
This is a super simple kit. It's definitely aimed at a much younger audience, as this one is designed to be built without even using nippers. As a result, the part count is very low and assembly is very basic but the outcome is a nice little Haro figure! A bit of panel lining goes a long way with this one.
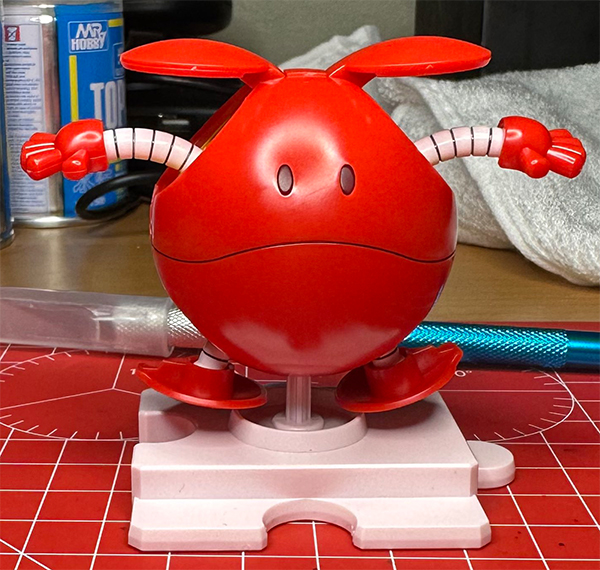
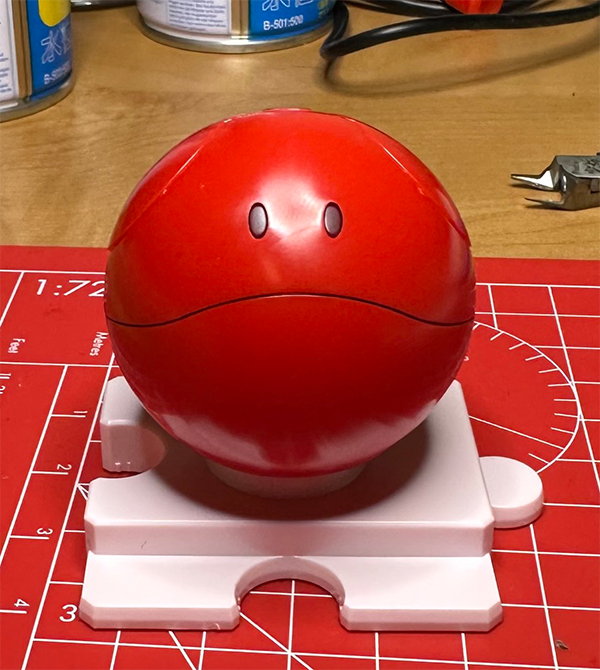
Bandai Spirits Best Hit Chronicle 1:1 Scale Cup Noodle
Technically not a gunpla... but it's a plastic model kit by Bandai and Cup Noodle probably exists in the various Gundam universes, so I'm going to say this counts as gunpla. It was released for the 50th anniversary of Cup Noodle and as far as promotional item goes, it is fantastic! The build manual is in the style of those you would find in a Gunpla kit, complete with Cup Noodle lore. I gave the top of the noodles a quick brown wash to make them look cooked and seasoned but I think I will give them a once over brown and orange Real Touch markers at some point.
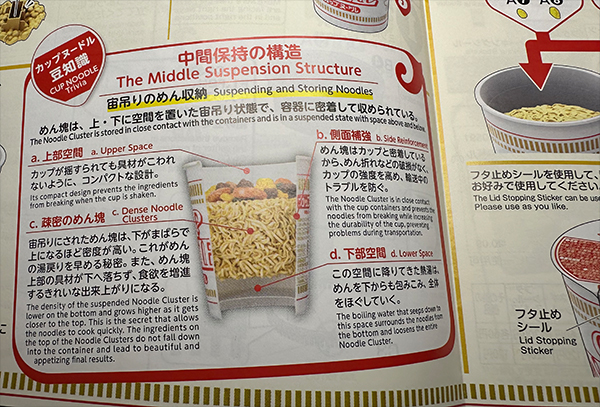
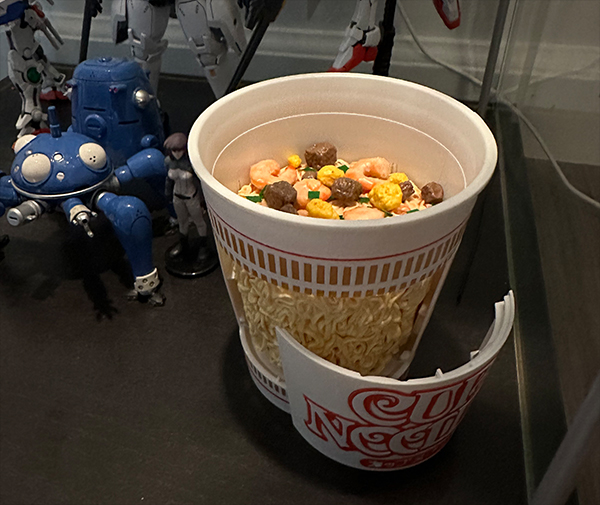

Flying action base adapter for Ikea Detolf
Shoutout to @GunplaAnalyst_749994 on Printables for the adapter and soozafone on thingiverse for the arms. I actually had to go through a few iterations of the clamp that connects to the Detolf's support rods as the adapter seems to be specifically for FDM printing. The resin I originally used was far too rigid, and would snap every time I tried to connect it to the rod. Once I mixed in some flexible resin... I found that the clamping portion was too thin at its thinnest point to provide support and it would come lose pretty quickly. Bulking that area out and extruding the clamping area such that zipties could be added made for a much more secure mounting point.
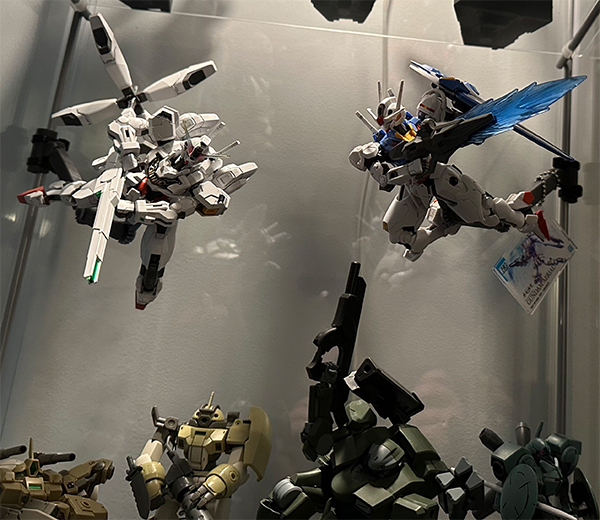
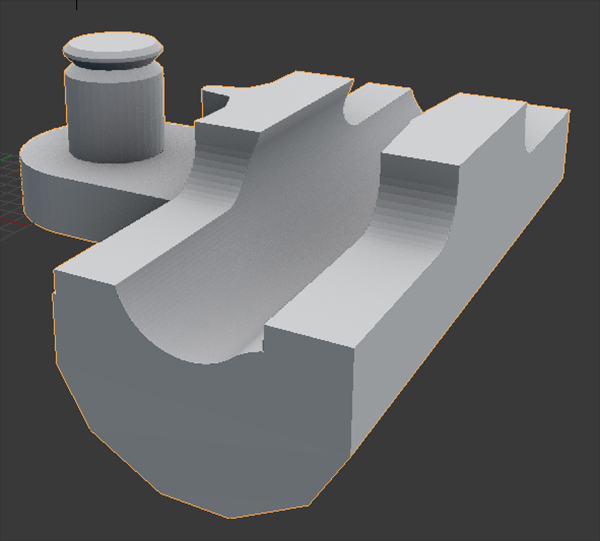
Hopefully the above version is the final iteration. The previous one had too much clamping force, and made it really difficult to attach and remove the mount from the rods in the Detolf case. I've also noticed that the previous design seems to slowly slide down the rod over time. Maybe, just maybe I've sorted it this time. If not... I guess it's back to the drawing board again.
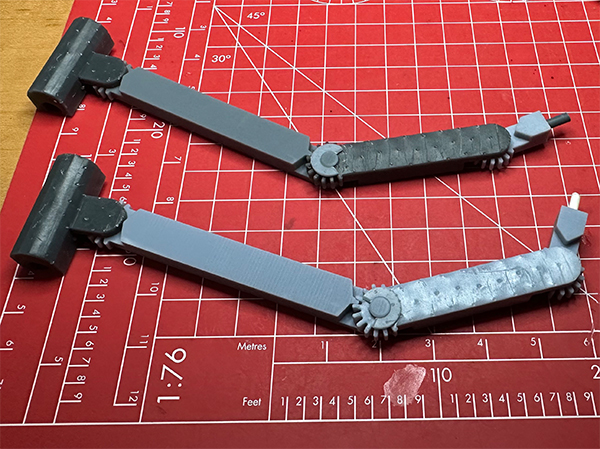
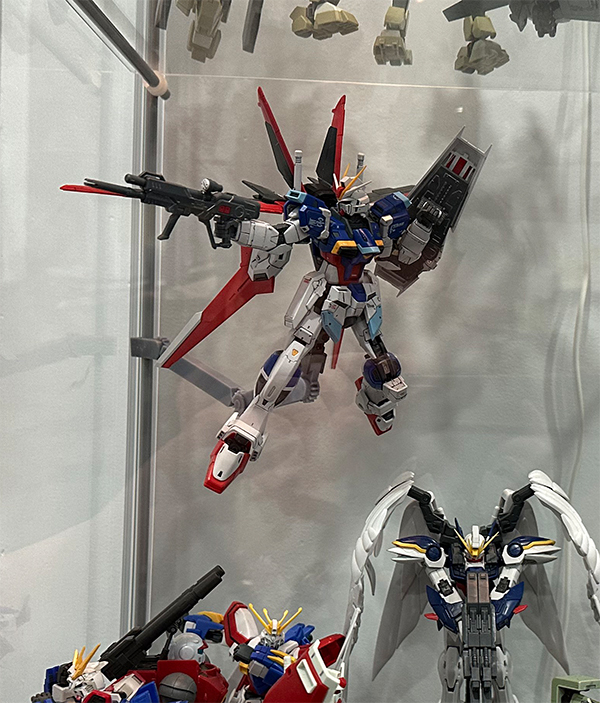
RG Force Impulse Gundam
I have built this one rather simply, using very little paint here and there, and minimal decals. The panel lining here is quick and dirty, and only white and painted parts have any topcoat. I tried something new with this one, panel lining black parts with a chrome silver.
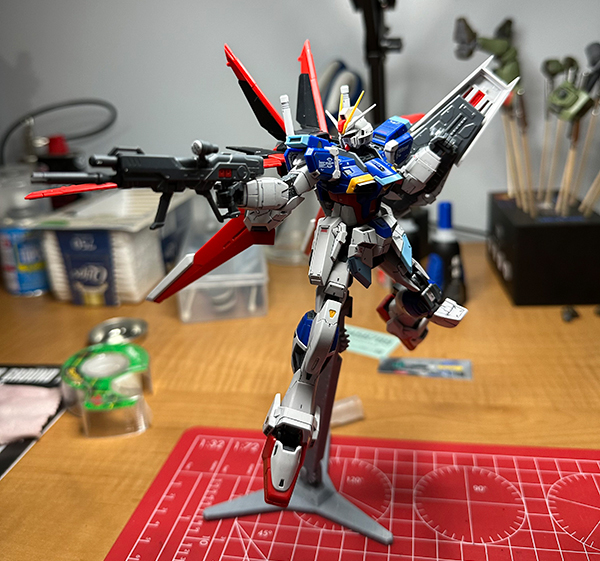
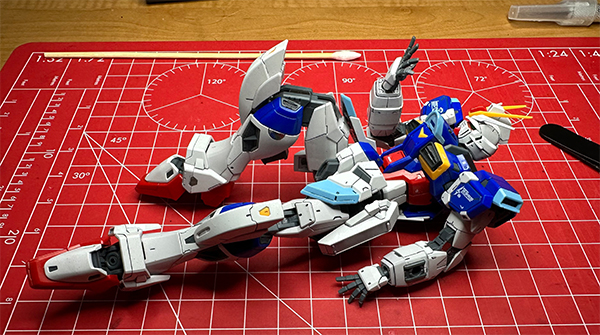
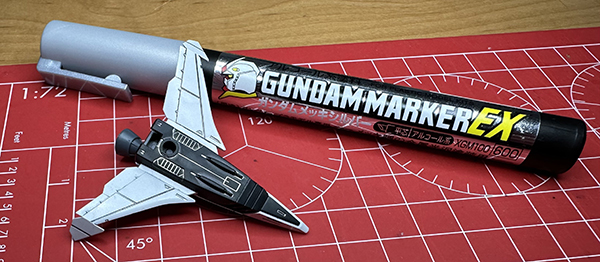
HG Calibarn
I really like this kit, it's a neat design and a fun build but even with all the decals and panel lining the detail gets lost in the sea of white plastic. I'll have to revisit this and give it some weathering.
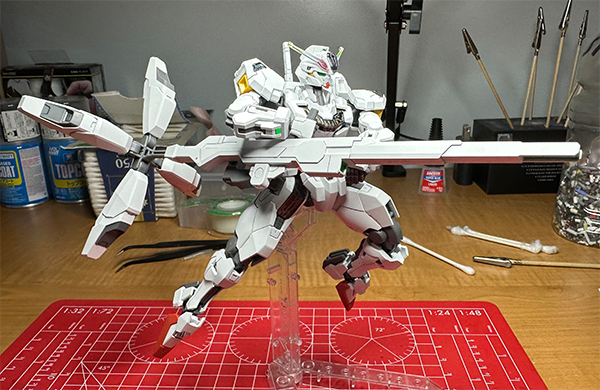
HG Zowort Heavy & Tickbalang
Yes, that flying carrier pad is called Tickbalang. I don't get it either. Fun build, neat looking Mobile Suit. Will definitely be revisiting this one for weathering as well. As an added bonus, there's a small and simple mod that allows the beam saber mount to be roated on the arm. This allows for some neat saber-hilt grabbing poses.